patterns >  Sue Pearson's Ravelry Store
> Adalynn Poncho


Adalynn Poncho
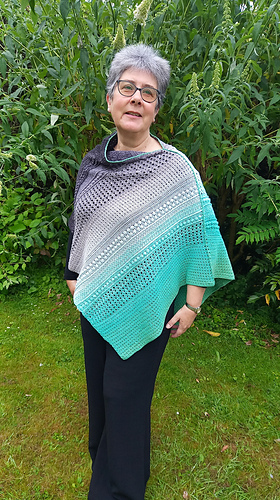
I wanted to design a light poncho that had texture and interest, one that used some of my favourite crochet stitches (V-stitches, bobbles and front-post trebles). I wanted the design to be relatively straight forward, so that I could enjoy the rhythm of the stitches without constantly referring to the pattern, but that also included a little challenge. The poncho is formed of one large rectangle, which is then folded and joined along the top edge, leaving a space for the neck. I used two Scheepjes Whirls in Minty Black Velvet on a 3.50mm hook. Pattern is written in English using UK terms.
Adalynn Poncho - Materials
Yarn: Scheepjes Whirl (60% cotton, 40% acrylic) 215-225g/1000m
2 x shade 785 Minty Black Velvet
Hook: 3.5mm crochet hook
Adalynn Poncho - Dimensions
Finished size of large rectangle after blocking: 60 inches by 22 inches.
Gauge: 20 rows and 33 stitches to 4 inches over pattern repeat for Rows 3-4.
Adalynn Poncho - Abbreviations (UK terms)
Ch - chain
Dc - double crochet
dc2tog - decrease by working 2dc together
Extdc - extended dc. Insert hook and draw up a loop (2 loops on hook), yo and pull through 1 loop, yo and pull through both loops.
Extdc3tog - work an extdc (see above) into the next 3 stitches, omitting the final yo of each st (4 loops on hook), yo and pull through all 4 loops.
St(s) - stitch(es)
Tr - treble crochet
FLtr - front loop treble crochet
FpTr - Front post treble (work around the stem of the stitch, inserting hook from front to back, around the post and to the front again)
Htr - half treble crochet
Yo - yarn over
WS - wrong side of work facing
RS - right side of work facing
Bobble - work 5 trebles into the same place, omitting the final stage of each stitch so that the last loop of each stitch remains on the hook (6 loops on hook). Wrap the yarn over the hook and draw through all of the loops on the hook
Adalynn Poncho - Pattern Notes
This pattern calls for 2 Whirls. I started the first Whirl from the inside (working green to black), and then used the second Whirl from the outside (working black to green).
I have provided charts after some written instructions, to help clarify the placement of stitches.
The wrap is worked in rows - turn at the end of each row.
When working the row following a ‘bobble row’, it’s easier to find the closing stitch if you rotate the bobble towards you slightly.
21004 projects
stashed
12276 times
- First published: July 2024
- Page created: July 22, 2024
- Last updated: October 19, 2024 …
- visits in the last 24 hours
- visitors right now


