patterns >  Laura Sutcliffe's Ravelry Store
> Birthing Mother & Baby


Birthing Mother & Baby
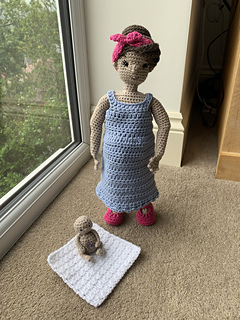
This design is intended as an educational toy, to teach children about childbirth in a simple accessible way. The doll’s body has an internal pocket to contain the baby and she has two openings for either a c-section or a vaginal birth! The pattern also contains the placenta and umbilical cord and if you use press studs (snap fasteners) then the baby can also breast feed.
This pattern is 25 pages long and includes the instructions for both the mother and baby, as well as the placenta, the umbilical cord and the baby blanket.
There is a pattern for a set of baby accessories (bottle, dummy/pacifier, Moses basket, baby cocoon, toy & hat) available separately too
The pattern contains loads of photos to help you every step of the way and it is written in American crochet terms.
You will need:
Yarn of your choice. Yarn weight doesn’t really matter - the size of your project will simply turn out bigger or smaller! I used Patons Smoothie DK Yarn (this is quite a thick DK yarn so it is equivalent to aran or light worsted weight in other brands) and my finished doll measures approx 40cm tall.
For the mother doll you will need the following colours:
Your choice of skin tone & hair colour.
The internal pocket which holds the baby can either be made in red or in your choice of skin tone.
Your choice of colours for her dress, shoes & headband.
For the baby you will need the following colours:
Your choice of skin tone.
Red for the placenta.
White or cream for the umbilical cord.
Your choice of colour for the baby blanket
A suitable size hook for the yarn you have chosen - I used a 4mm hook.
Toy stuffing.
Clear plastic press studs / snap fasteners (this is optional but allows the baby to breast feed.
Black finer yarn or embroidery thread for adding the mother’s eyelashes & the baby’s eyes, and a suitable colour for adding the smile (& nipples if you’re not using press studs).
A pair of 6mm black eyes.
A small button to use as the baby’s tummy button.
Other tools you will need are a tapestry needle, some scissors and a stitch marker. You will also need a needle and thread for attaching the button and press studs.
You are welcome to sell the items that you make using this pattern, but please do not sell / share the pattern itself. Feel free to contact me with any questions as I am more than happy to help. Thank you.
- First published: July 2020
- Page created: July 9, 2020
- Last updated: August 14, 2021 …
- visits in the last 24 hours
- visitors right now


