Modifications: Made a more rounded toe
Knit longer toe before starting instep pattern
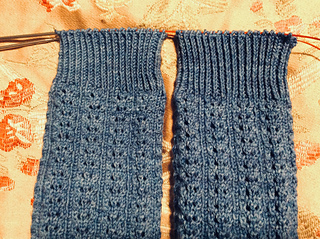
Changed the stitch design from the 6-stitch repeat in the Field Guide into an 8-stitch repeat.
Eye of Partridge Flap and Gusset Heel
Knit longer leg length
Negative ease adjustments:
Sock circumference = 90% of ankle circ.
Sock length = 1/2” shorter than actual foot
Eyelet Lace:4 Row repeat of 8 sts:
Rows 1-3:K1, p1, k5, p1 repeat across
Every4th Row: k1, p1, K2tog, yo, k1, yo , SSK, p1
https://www.winwickmum.co.uk/2017/07/easy-lace-socks-free...
Foot Measurements
When choosing sizes in a pattern, foot circumference is more important than shoe size which is based on foot length.
Four most important measurements are foot circumference at rest (without weight ie not standing on foot), midcalf circumference which is about 6” from floor, foot total length and foot length minus Toe length which is about 2”.
Trace foot when standing and mark for toe length and depth of heel cup. Write down these measurements plus total foot length measurement when standing when heel against wall and write the foot circumference when foot is at rest ie not standing on it.
Foot circumference 9.0”
Ankle circumference 9.0”
Calf circumference at sock ht: 10.25”
Foot length 10.5”
Using 10% negative ease at ankle and 12% negative ease at Cuff w target leg stitch count of 72 sts.
Using 14% negative ease in foot for sock durability and to eliminate any extra fabric at toes and heel when wearing with shoes and with heavy walking. Target stitch count for foot is 68 sts.
Sock circ. foot: 8.75 x 0.90 =7.75
Sock circumference calf at sock ht: 10.25” x 0.90 = 9.3”
Sock length: 10.5” - 0.5” = 10”
Sock height 9”
Ankle bone height 2.5” (for heel flap ht)
Gauge: 9spi and 14 rpi
Used 4 repeats of lace pattern across instep balanced over the 34 instep sts.
After the heel, used 9 repeats of lace pattern over the 72 leg sts.
Toe is 26 rows
Foot is 60 rows (15 repeats of pattern)
Heel is 51 rows
Leg is 75 rows (18 repeats of pattern + 3 rows past YOs)
Cuff is 18 rows
Toe and heel base is 10 sts across
Sock Measurement Chart
http://kateatherley.com/2017/08/10/foot-size-tables/
Discussion and calculations:
The needles are ChiaoGoo Shorties. I love the more flexibility of the “mini” cables. I didn’t care for Magic Loop with the ChiaoGoo “small” gauge cable but gave it another try with the “mini” gauge cable—what a difference!! The mini cable come in the ChiaoGoo Mini Set as well as their Shorties. My 5” needle tips in the US1 from the Mini Set are being used in another project and I thought I’d have to wait to cast on for these socks. Then I remembered the Shortie Set and grabbed the 3.5” needle tips from the Shortie Set with the 30” mini cable from the Mini Set so I can Magic Loop.
The denser gauge for comfort and durability for socks is about 1-2 sts more Per inch than what the yarn band suggests.
Sock Sts = Gauge in spi x Foot Circ x 0.9
CastOn sts = About 1/3 of Sock Sts
The increases between the cast-on sts to full number of sock sts need to occur in groups of 4, thus the difference between the cast-on number and sock number must be divisible by 4. If the foot has wide toes ad 2 to the cast-on number; if pointier toes, subtract 2 from cast-on.
CastOn 20 sts. using using JudyBecker’s Magic CastOn.
Knit 1 round.
Increased using kfb w 2knits between the increases at the sides.
For more rounded toe increase more quickly right after CastOn by increasing every row for half the increases needed. Then increase every other row. Other versions also have quick every-row increase (or decrease if cuff Down) for half the stitches needed to be increased (or decreased) and vary by doing the the increases every 2 rows for the rest of the increases or finishing the last one or two increase rows every 3rd row to end the toe more gradually.
I increased every row 6 times then increased every other row 6 times for total 68sts.
Work even until toe is 2” long then start double eyelet pattern on instep.
Calculations to determine how long to knit foot before starting Flap and Gusset style heel These calculations are for Toe Up Heel Flap and Gusset; therefore different than the pattern’s calculations for Cuff-Down.
Flap and Gusset style heel: intended sock length - (number of rows in gusset and heel cup/ row gauge per inch)
10” - (51 rows / 14.5 rows per inch)
10”- 3.51” = 6.49” from toe cast on to start gusset incr.
Total sock length should be 1/2” shorter than actual foot length for negative ease. (For children use 1/4” shorter)
10.5” - 0.5” = 10” target sock length
Calculating rows for gusset and heel cup:
Gusset sts per side = sock sts x 0.2
(68 x 0.2 ~ 14)
Rows for gusset = 2 x gusset sts because gusset increases are done every other row.
2x14 = 28 rows for gusset
Rows in Heel Cup = Total Heel sts- Heel Base sts
34 - 11 = 23 rows for heel cup
Rows for Gusset and Heel Cup: 28 + 23 = 51 rows
Length of Heel & Gusset = (gusset sts x 2) + (heel sts - heel base sts) / rounds per inch
Length of Heel + Gusset = (28 + 23) / 14.5 = 3.51
Heel Base Sts = About 1/3 Heel Sts or round down
When rounding these numbers to whole numbers, if Heel Base is an odd number, Heel Sts will need to be odd, too and even heel Base Sts If even heel sts.
Length of Heel Cup: (Heel Sts - Heel Base Sts)] / Rounds per Inch
http://wynnknit.com/documents/Yarnover%20Toe%20Up%20Short...
Foot:
Since Gusset and Heel Cup is 3.51” in length along bottom of foot, work even until sock is 6.5” from toe cast on for a target sock length of 10”.
(sock target length is 1/2” shorter than actual foot length to allow negative ease.)
Gusset stitches Increased every other row until there are 17 stitches added to either side of heel stitches while working pattern on instep sts.
Gusset Increased to Total of 68 sts on the heel needle.
34 heels + twice the 17 gusset = 68 st on heel needle.
http://www.withwool.com/blog/2015/11/4/how-to-do-the-math...
Now work back and forth on heel and gusset sts on one sock as you make the Heel Turn and the Heel Flap. The other sock can still hang out on the long cable.
Heel Turn: The back of the heel is shaped with German short rows that are worked on the stitches that form the bottom of the foot. The heel sts are worked back and forth in short rows on 34_ (Heel sts) sts between the heel markers which correspond to half of the initial 68_(Sock sts) until you have 10 (Heel Base sts) in the center flanked by the DS. After last DS on wrong side, turn, work across heel base and work DS sts until you get to last DS before gusset sts. Work last DS with first gusset st as SSK, turn, s1, purl across entire heel working DS on other side until last DS before gusset sts on other side, work the last DS w the first gusset as p2tog, turn,
start Eye of Partridge pattern (RS)w garter border: s1, k2, k1, s1 repeat until last three stitches. K2, SSK w next gusset sts to close gap, turn
(WS) s1, k2, purl across to last three sts. K2, p2tog with nest gusset sts to close gap.
(RS) s1, k2, s1,k1 repeat
Continue flap and decreasing the gusset sts until one gusset st remains at each end. Turn to RS. If using contrast yarn for heels, now switch to main color. S1, knit across Heel working the gusset st that follows the heel sts.Then work heel turn and heel flap on sock A of 2AAT.
Work across instep in pattern, work the last gusset st w first heel st as K2tog. Continue working Heel sts in pattern.
Pick up on Garter edge on contrasting heel flap
https://youtu.be/KvPJFyxusRc
Two Ways to Close Corner Gaps of Flap & Gusset
Holes often develop at the boundary between the instep sts and Heel Sts when the sts are rejoined for working in rounds. This is due to the geometry of a toe up sock. If all of the heel flap/gusset decreases are completed when working in rows, the back of the leg would essentially be a row or two taller than the front of the leg. This length difference causes a gap.
1: To mitigate this, resume working in rounds when 1 gusset st remains to be decreased on each side. This ensures the same number of rows or rounds are on the front of the leg as are on the back of the leg. The final gusset decreases are worked in the first round of the leg to further minimize any gaps at the corners of heel.
2: If a gap is still evident, it can be eliminated in the first round or two of the leg by working 2 sts together across the gap as follows: when you have worked the last st of the instep, use the left needle tip to lift the left leg of e st 2 rows below the st just worked and place this lifted leg onto the left needle tip in front of the back of leg sts. Then knit this lifted leg together with the first back of leg st as K2tog. Work to 1 st before end of the back of leg sts, then slip this last st knitwise to the right needle. Use the right needle tip to lift the right leg of the st directly below the next st on the left needle (that is, the first st of the instep). Insert the tip of the left needle into these two sts and knit them together through their back loops as for an SSK. These increase/decrease pairs might distort the fabric a bit, but because it’s positioned directly above the heel it’s not as noticeable.
After finishing heel and knitting one row, increase from 68 sts to 72 sts along heel needle and arrange so there are 32 sts on instep needle and 40 sts on heel needle. (Decr the extra purl st from each end of the instep row and incr 6 sts along the heel needle) You will have 4 repeats of the 8 sts lace pattern on instep and 5 repeats of the lace pattern on back of leg.
Fix on lacy pattern
On one of my lace repeats I forgot to do the yo and directional decreases resulting in a patch of stockinette in the middle of the lace design.
I dropped 5 stitches down 6 rows and using a very tiny 1.3 mm crochet hook corrected the section including two sets of the double eyelets. Instead of laddering up each column of stitches, I found it easier to work horizontally across affected stitches using up one ladder at a time before moving up to the next ladder. I placed a removable stitch marker on the bottom-most ladder that use currently being worked with to help keep it separate from the other ladders. I held my crochet hook in my right hand like a knitting needle and worked across the stitches keeping the newly formed sts on the crochet hook until finished with the stitch in that row. Then transferred the sts from the crochet hook to a knitting needle, moved the stitch marker to the next ladder up and repeated until all ladders were knitted up.
I wish I had a before picture but here’s the result of the fix.
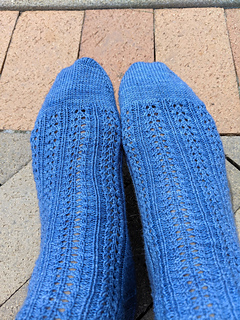
It’s the 2 sets of double eyelets in the second column from the left in close up photo of instep columns.
Leg Worked 75 rows for the leg on 72 sts.
CuffDid 18 rows of ribbing
Cuff rows = 25% sock sts
0.25 x 72 sts = 18 rows
Used Tubular Cast-off w 2 rows of set up
Other 3 stretchy sock bindoffs I’ve used in the past are: Russian Lace Bindoff (k2, insert left needle tip into fronts of these knit sts left to right and knit off as if for an SSK.) or Jenny’s Suprisingly Stretchy Bindoff or EZ Sewn bindoff.
These stretchy bind-offs are shown in the photo with the three striped cuffs in purple/grey colors.
Elizabeth Zimmermann’s Sewn Bind off which is my favorite and very simple to do.
Sew through the loops of the first 2 stitches R-L as if to purl, back through the loop of the first stitch L-R as if to knit, pop it off the needle, repeat. The sewn bin-off is shown on the green/beige stripe cuff in the same photo of three cuffs.
The Tubular Bind-off is shown on the blue cuff of the lace sock in the photo with two cuffs. The other cuff in the photo is the Twisted German CastOn worked in one row of purple on the grey cuff. These are my top two favorite cuff edging.
Stretch and Flare of 20 Bindoffs
https://www.susannawinter.net/post/updated-comparison-of-...
Another Cable and lace Toe-Up sock
https://lookaside.fbsbx.com/file/Ribs%20around%20Horn.pdf...
Vintage lace socks
http://sticketyg.se/patterns/lingerie.html
http://sticketyg.se/pdf/Lingerie_Charts_M_L.pdf
****************************
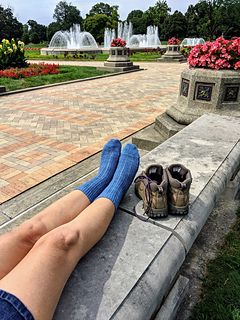
Why am I so excited to learn how to make socks to fit me?
For twenty years my husband would get me my favorite Smart Wool socks for every Christmas and birthday. The women’s large is to fit Euro size 42-45 (My Vasque hiking boots fit beautifully at a 42) but the SmartWool sock heel would not quite fit over my heel (see photo of striped sock) My hand knit socks actually fit my foot, are comfortable, and a perfect length for the hiking books. Went on a biking trip with family, hiked, and visited the gardens—lovely day and lovely socks!!
Worked on these socks while taking my youngest son over to the pool where my oldest son was lifeguarding.
Ease
Ease should be adjustef for fabric stretch:
Stockinette has ave stretch and use 10% or about 1-1.5”.
Lace has lots of stretch so use 2” neg ease so it doesn’t become baggy around leg.
Stranded color work has no stretch and slightly pulls fabric is so use 0 ease and fit over heel.
Personal prefer in amount of ease desired.
Subtract 1/4”- 1/2” in total foot length for sock length.
increase or decrease sts at the ankle eight before splitting to make heel flap or double up decreases in gusset.
Adjust length heel flap. Try on after working heel flap to check length. Heel flap length impact number of sts picked up for the gusset and number of sts after rejoining in the round which impacts the circumference around the ankle. For each two rows increase or decrease from heel flap length (always paired two rows because you want to end on a WS row) you’ll pickup one additional sts in gusset at both sides for every 2 rows added.
For short row heels, add rows in before slipping for heel for deeper heel
Modify gusset by decrease faster or slower to match arch of foot.
Different Heels
Tube sock for infants might be good because rapid growth causing change in heel placement won’t matter. Tube socks stretch over heels and wears out but gather across instep where leg transitions to foot.mThis is less of a problem with infants not putting weight on feet yet.
Short Rows and After Thought as shallower heel so would not be good for high arches of if instep stitches distort or don’t stretch as with cable or stranded work.
Fleegle(toe-up) and Strong Heel (named because designer’s last name was Strong not that there’s any added strength to heel area. None of the Tube,Short Rows and Fleegle/Strong have any reinforcement at back of heel like the Flap and Gusset so all those designs are more simple but less options to modify for better fit and the less structured heels may drop down.
Flap and gusset has more structured heel and more ways to modify for better fit.
For high arches try Heel-out patterns or double gusset or a under the foot single gusset
Kate Atherley book helps one determine if they have a high arch. The diagonal circumstances is bigger than ball of foot. Trouble getting sock over ankle and stretch so fabric is no longer elastic and fits tightly across the top of instep, high instep vs high arch.
Flat Feet: short row or standard gusset w no shaping at the bottom. You could leave more sts on the front if doing a short row heels and add some more sts for the heel itself by doing stitch increases on the back side of sock for a couple of rows before splitting for short rows which gives you more short rows which gives you a little bit deeper heel. Flat feet are usually more wider foot and taller. So if need wider foot from ankle you could either add more sts before short or take out some decreases in the gusset and space then out every three rounds vs every other round.
Choose different toe length or shaping.
Circular and Star Toes are a longer construction and avoid grafting Kitchener.
Wedge Toe result in shorter toes.
I have 2.25” toes and still prefer wedge but adjust frequency and make a rounded wedge and prefer Kitchener to finish toes.
Using 68 sts for foot circ and 72 sts for leg circumference
Ribbing: k2p2 springs back better than k1p1.
Tubular Caston will stretch out with wear and then if you get it wet it again it’ll come back together. German Twisted is a good one and more stretchy.
Longer amount of ribbing will retain stretchiness longer.
Superwash wool socks don’t stretch out with wear but retains stretchiness similar to no superwash wool
The nylon helps super wash mimic what wool does on own and the properties taken away in super wash process but does not make sock more durable. Nylon adds structure when added to superwash wool socks so it won’t lose its shape.
You don’t need nylon in natural wool because wool itself will hold itself together.
If using natural wool look for wools with a higher micron count you don’t need nylon.
Many people don’t like cotton and plant fibers on foot. Also cotton blends lose shape but you could hold strand of nylon thin tread to keep cotton socks from stretching out. Plant fibers cotton, bamboo and superwash wool lack memory and will stretch out of you don’t add elastic. They come back together with blocking.
Blocking doesn’t make the sock necessarily for better but to make the fabric prettier and the sts more even. Don’t cut ends off until done blocking, trim ends to show they’ve been woven in, because when you submerge it in water and it completely expands and fills with water the fibers are all going to expand. They are going to move around and get comfy and then as they dry, they settle down into place and your tension appears significantly more even and it’s magical and the woven ends are much likely to stay out after blocking and go ahead and trim them down now. Lace sock definitely need blocking. You want lace to stretch and showBlocking is for the pretty factor and sts vs fit.


 HeyKerrieAnn notebook
  handspun
 queue
queue favorites
 friends
 needles & hooks
 library