Warning: These notes are extensive, so if you mean to read them, prepare a nice cup of tea first :)
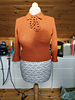
Pattern errata: The jabot is stated to be knitted in the rib pattern of the jumper, but according to the picture it’s knitted in garter stitch.
There’s also an issue with the size of the jabot. What the pattern calls the larger piece comes out the same proportions as the smaller one, judging from the picture. Please see the section on the jabot/cravat further below for details.
15.11.2018 - interpreting the pattern
The instructions are quite minimalist. Reminds me of old Norwegian patterns, where the pattern maker obviously expect the knitters to be experts in need of very little guidance. This pattern forces the knitter to figure out things for herself rather than have it spelled out. I don’t mind as I’m used to re-sizing vintage pattern and also used to drafting sewing patterns, but I don’t think this pattern is suitable for beginners, and maybe not even intermediate knitters.
8 sts pattern repeat for the basket stitch, which is done over 8 rows total.
Rib stitch for the sleeves and yoke:
3 sts repeat
The rib pattern forms a V at the front and back. This is commenced after the first 8 rows of basket stitch.
Add 1 stitch in the very middle of the front (and back) for the centre rib, and from now on expand the ribbed section every 4 rows, both to the left and right of the centre, the full 4 stitches of the basket stitch. Do this 6 times, not including the centre rib.
Now knit straight until you reach the armscyes. Shape the armscyes as normal for set in sleeves with a wide yoke. Once half of the armscyes has been completed, split the front in the middle for the front slit. Knit each yoke peace separately.
The sleeves seem to balance on the tip of the shoulders, which for me will mean a 4 inch shoulder seams. Shape shoulders before casting off.
The pattern doesn’t really say anything about how the slit closes, just that the cravat/jabot (the pattern calls it a jabot, but to me it looks more like a cravat) snaps onto the jumper, over the slit. I’m considering a hook and eye fastening, and snaps stitched onto either side of the slit, concealed under the collar. I might make more than one cravat, for variation.
Welt: k2, p2
15.11.2018 - gauge
Recommended gauge:
5.1 sts per inch.
Gauge for basket stitch on 2.75mm needles using Drops Fabel: 7.4 sts per inch
10.5 rows per inch
I suspect the original yarn was a little heavier than the one I’m using, but oh, well, I’ll just have to do the math.
18.11.2018 - torso
Cast on for torso in the round:
216 sts, increase to 236 after the welt
Increase to 264 at the bust (36 inches)
7 side increases
Looks like this will follow the proportions of the original jumper pretty well.
It’s knitting up nicely, but it feels a little like knitting blind, since the stitch pulls the knitting together as much as it does. I think it will turn out lovely, though.
Just noticed that according to the pattern one should make 18 pattern sections before starting the armscye, but the jumper in the picture only has 16. I think I’ll go for 18, as I want the jumper to measure 12 inches from hem to armscye.
01.12.2018 - armscye
Same shaping for front and back
Row 1: cast off 7 sts at beginning of row
Row 2: as row 1
Row 3: cast off 2 sts at beginning of row
Row 4: as row 3
Row 5: cast off 1 sts at beginning and end of row
Row 6: knit in pattern
Repeat the last two rows 4 times.
There are now 104 sts left on needle
01.12.2018 - neck slit and front neck shaping
Once you start the armscye shaping knit for another 3.75 inches and then divide the front down the middle. Knit each front part separately from now on.
Start shaping the neck 2 inches after dividing for neck slit. Total width of the neck shaping will be 2.75 inches. Length will be 2.4 inches. See chart for details.
Armscye length will be 7.5 inches.
Well done me :) The neck and armscye came out perfect.
18.12.2018 - sleeves
Cast on: 79
take off 1st sts, then p2, k1… end with p2, k1
Increases:
Knit 10 rows then start shaping
Inc Row: K1, m1, work to last st, m1, k1 -- 2 sts inc’d.
Rep Inc Row every 4 rows 8 more times, then every 6 rows 7 times -- 32 total sts inc’d, total number of stitches now 111.
Work even in patt to cap shaping.
Start sleeve cap shaping when sleeve measures 11 inches.
Sleeve cap:
Follow chart.
27.12.2018
In a fit of laziness I decided to try out an online sleeve pattern generator and then followed the sleeve shaping suggestion I got without checking the math. When will I learn? Always do the math myself! And then double and triple check it.
The sleeve shaping ended at about 7 inches, leaving the final 4 without shaping. Hopefully that’s not going to be a problem due to the stitch pattern, and also because my upper arms has a quite even diameter all the way from the elbows to the armpits.
30.12.2018 - Cuffs
Cast on 78 sts, follow pattern as written
Increase every 3rd row until you’ve reached 106 sts (14 increase rows).
Cast off after 9th basket pattern
Crochet UK DC along the slanted edges (Might continue the border all the way across)
A little bit of moaning: It’s been an interesting knit, but at the moment I feel like it’s only my stubborn streak keeping me going. I finished the torso and sleeves, and there is still lots left 
30.12.2018 - Collar
Cast on 104 sts. The original collar measured approx. 13.5 inches, but I’ll need 14.
Cast off after 8th basket pattern. Crochet edge same as the cuffs.
30.12.2018 - Cravat
Garter stitch
I followed the instructions of the larger piece first, and placed it on the jumper to see how it would compare with the picture, and it came out the same proportions as the smaller one. So I’ll use this for the smaller one, and for the larger one cast on two stitches more, and knit 10 ridges more before shaping the point.
Smaller piece:
Cast on 14 sts
Increase beg and end of ridge 3, 6 and 9
Work another 20 garter stitch ridges, then decrease i stitch at the beginning of every row.
Larger piece:
Cast on 16 sts
Increase beg and end of ridge 3, 6 and 9
Work another 30 garter stitch ridges, then decrease i stitch at the beginning of every row.
31.12.2018 - Fit
The jumper turned out just a little tight over the bust to my liking. I could easily have added 2 more inches of ease. The waistband was fine.
The jumper came out 36 inches over the bust after blocking (which was what I wanted). The shoulder width came out perfect.
The yarn, Drops Fabel, can be a little scratchy to work with, but softens wonderfully after washing. As with the other Drops yarns it tends to grow when wet, but pulls back again as it dries.
The yarn is quite fine, and makes this jumper both lightweight and unforgiving about curves. Longline shapewear might be an idea.
If I were to knit this jumper again using the same yarn I’d add 16 stitches more, just after the ribbing, keep the side increases the same, and do 4 basket stitch repeats before starting the V-shaped ribbing in the middle.
Please note that it works well as it is, but I have to wear it with a longline bra 
I think this jumper would look fab in a slightly heavier yarn too
18.08.2023
Decided to add more basket stitch repeats after the ribbing, so separated the ribbing from the top to add them. Not 100 percent sure how many, but will see  It’s well worth the extra work, as the starting point of the welt bothers me enough to not want to wear the jumper as it was.
Added 6 repeats, approximately 2,5 inches which was perfect. Will add length to the sleeves as well.
Cast on 61 sts, knit in pattern for 2 inches, then increase start and beginning of every 9th row.
26.08.2023
Done Just need to block it.


 vintagegranny notebook
  handspun
 queue
queue favorites
 friends
 needles & hooks
 library