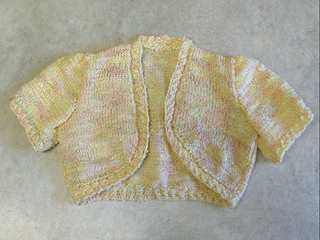
July 2014: The sleeves seem rather large for the armholes, but it’s not clear from the pattern photo whether they are supposed to be puffed or not. Eased them in with the extra length arranged around the top.
Sewed backstitch seams as directed, one stitch in from the edge due to the uneven nature of the thick-and-thin wool. Of course on a garment this size, the resulting seams are disproportionately thick and heavy….
Fortunately the mock-cable borders are extremely stretchy, so reasonably easy to fit around the bottom edges of the bolero. Not very happy with my slip-stitch edge attachment as this seems to produce a ridge on the right side of the garment, but at least the uneven nature of the wool means that the uneven nature of the sewing doesn’t really show!
24 June 2014: Knitted left front (approx 2.5 hours). Slightly worried that the border strip at the bottom appears to be a good inch shorter on one side than the other…!
Began knitting first sleeve band. According to my calculations of original row tension this ought to be about 9.5” long.
NB remember to reverse cable pattern for other sleeve band.
23 June 2014: New right front complete. Old right front immediately unravelled, since they are all but identical in appearance and there was considerable scope for confusion! The new one is actually that crucial half- to three-quarter-inch narrower, and the border strip looks as if it is actually going to stretch around the bottom.
Looking at my earlier notes on how to knit reversed false-cable, I see that I’ve been using a different technique (knit third stitch, then second, then first), which accounts for the change in appearance where I continued knitting the border up the front! I think the original, less obvious method produced better results. Oh well.
20 June 2014: Re-knitted back piece, simply following the instructions for the smallest size which seems to produce the right width.
Unravelled and re-knitted front piece… discovering when I came to incorporate the border strip that I’d unravelled the left front and reknitted it as the right front! It doesn’t really matter since the only effect is to reverse the mock cable direction on the two pieces, which was completely arbitrary anyway. Worked fifteen rows up to armhole decreases (instead of eleven as per pattern for smallest size) in order to match the back, which was knitted to match the old fronts…. This compensates for the fewer rows knitted in the shaping due to the width decrease. I’m hoping that the result should be to produce a garment of less width but more or less the same height, as desired.
12 June 2014: Completed the back piece and matched it to the fronts…. Of course with the extra unwanted width the integral knitted bands are too short! The pattern instructs to to knit a good inch extra in length on either side for the 28” size, so there is no way they are going to meet in the centre-back.
I could pick up stitches and knit an extra inch or more onto either band, but I really think that this may be a sign that it’s better to unravel the whole garment and re-knit, adjusting the stitch counts to remove an inch (seven stitches) from either side and two inches from the back. That half-stitch error in the tension is just too much to cope with.
At least, having knitted the whole thing up, I can now visualise it and work out where the pattern needs to be altered.
6 June 2014: With both fronts knitted and a good strip of the back complete, the garment is fairly obviously going to come out at 28” wide instead of the 26” size - fortunately there is only about half an inch difference in length between the two, so it shouldn’t be too distorted, but given that I was only working the 26” chest to give room for growth in the first place I’m afraid she’s going to have to do quite a bit of growing….
3 June 2014: How to knit a left-leaning twisted stitch (mock cable) - put the needle behind the work and knit into the second and then third stitches on right-hand needle, then come back and knit into first stitch. Drop all three.
2 June 2014: As usual, I had to move down a needle size to get the right number of stitches per inch: still a bit wide, but if I go down any further I shall be seriously short on rows per inch, and with all that shaping on both edges it isn’t just a matter of ‘knit until 16 inches from bottom edge)….
I’ve never come across a pattern that knitted the edging separately and then joined it in to the main pieces in mid-shaping before! I didn’t like the pattern given for the edging bands (I realised afterwards that I was actually looking at the back, but I still don’t think it worked very well with this textured wool) and substituted a three-stitch twist/false cable pattern which is seven stitches wide in place of the original’s six stitches. I’m hoping the twist will pull it in a bit… otherwise, that is just going to be a rather wide garment and Joyce will have to grow into it!
 HarrietBazley >
  notebook > projects > Rose-gold Bolero


 handspun
 queue
queue favorites
 friends
 needles & hooks
 library