Yarn & Supplies
Used walmart’s knock off of RHSS in the “yoshi green” color. Not sure what the color was called specifically. Mighta just been “green”. Instead of buying a whole skein of white and yellow for the project, I opted to use felt ($0.23/sheet) for the white and yellow accents. Sewing them on was challenging, notes on that below. The red and brown (detail accents) yarns were unraveled from sweaters, 100% cotton. I had a small ball of each on hand left from a blanket project before this one.
The kid is from Michigan, and I being an Ohio State Alumnus could not (did not. would not.) resist heckling him a little with my leftover red yarn and white felt. The flag was actually a “special gift” for a friend of his who I was also online-close with in the game.
Background and Method
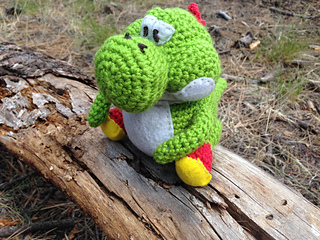
I, until recently, played Clash of Clans, and a former clanmate (who I’ve never met) asked “Jenny do you actually knit?” (my Clash handle being JennyTheKnitter), then he asked me if I’m any good, lol…I threw some knitting jargon at him that I knew he probably wouldn’t understand just to be cheeky: “my stockinette tends to row out sometimes, but other than that, yeah, I can hold my own.” He asked if I could knit him a Beeg Yoshi. I asked, “beeg? You mean fat like a Buddha?” So we started emailing and he sent me a pic of beeg yoshi--yep. Fat like a Buddha.
So it was in March that he asked me, and I was very excited to start the project--something about a teenager wanting a knitted thing energized me. Also, I knew it would be a challenge. As you can see from my projects, I don’t do much ami, let alone custom ami, and that was something that lit my pilot light as well. It wasn’t until May that I could get the yarn. It turned out that I bought the yarn on his birthday, so that was kinda neat. And I set to it.
I followed the pattern only very loosely. I knew I wanted him about 5” tall, and for him to be “beeg” he had to be about 4” wide, so I measured and just sorta guessed my way through the increases, row counts, and decreases.
The only thing I think I didn’t modify was the shoes and maybe the eyes. The arms are the same except I made them longer. I hesitate to call this a completely original pattern, but almost none of the stitch counts are the same, though the construction is quite similar. The head is actually picked up off the completed, closed and stuffed body rather than being one contiguous piece. The final version is my second draft. The first draft can be seen in the last 2 pics--his proportions are too tall& skinny to really be “beeg.” The neck was a challenge as beeg yoshi really doesn’t have much in the way of a neck. Originally, I made sharp decreases at the top of the body then sharp increases at the bottom of the head then created a crease at the neck and sewed the bottom of the head to the top of the body in an attempt to create that “snowman” look. It worked okay, but I knew I could do better. It came to me suddenly one day after I’d gotten all the bits and bobs attached, and I’d told RiGuy that “I can probably send him next week.” While I was awaiting him to reply with his address, I started a new yoshi from scratch. The old one had gotten dirty anyway (I live outside, so that tends to happen), and his attachments didn’t seem to be aligned well.
For the 2nd draft, I was sure to wash my hands thoroughly before working on him, kept him in a zipper bag when not working on him, and marked the center of the front/back/sides at 3 points going up his body so that later accurate placement of the cheeks, nose, etc would be easier.
Body
Rnd 1: Magic ring 6
2: sc inc 6x (12)
3: (sc inc, sc 1) 6x (18)
4: (sc inc, sc 2) 6x (24)
5: (sc inc, sc 3) 6x (30)
6: (sc inc, sc 4) 6x (36)
7: (sc inc, sc 5) 6x (42)
8: (sc inc, sc 6) 6x (48)
9: sc in 48 sts
10: sc in 48 sts
11: sc in 48 sts
12: sc in 48 sts
13: sc in 48 sts
14: sc in 48 sts
15: sc in 48 sts
16: (sc2tog, sc 10) 4x (44)
17: (sc2tog, sc 9) 4x (40)
18: (sc2tog, sc 8) 4x (36)
19: blo (sc2tog, sc 4) 4x (30)
20: (sc2tog, sc 3) 4x (24)
stuff
21: (sc2tog, sc 2) 4x (18)
22: (sc2tog, sc 1) 6x (12)
23: (sc2tog) 6x (6)
Close hole (does not need to be nice, will not show in finished product).
Head
Note: I’m pretty sure that in the final version, I omitted Rnd 14.
join in any unused loop from rnd 18 on body. ch 1
Rnd 1 Note: all stitches of Rnd 1 are worked into unused loops of Rnd 18 on body.
1: sc inc in same st, sc in 4 sts, (sc inc in next st, sc in 4 sts) 5x. (36)
2: (sc inc in next st, sc in 5 sts) 6x (42)
3: sc in 42 sts
4: sc in 42 sts
5: sc in 42 sts
6: sc in 42 sts
7: sc in 42 sts
8: sc in 42 sts
9: (sc2tog, sc in 5 sts) 6x
10: (sc2tog, sc in 4 sts) 6x
11: (sc2tog, sc in 3 sts) 6x
12: (sc2tog, sc in 2 sts) 6x
13: sc in 18 sts
14: sc in 18 sts
15: (sc2tog, sc in next st) 6x
16: sc2tog 6x
FO, close hole.
Nose
1: MR8
2: (sc inc in next st) 8x
3: (sc inc in next st, sc in next st) 8x
4: (sc inc in next st, sc in 2 sts) 8x
5: (sc inc in next st, sc in 3 sts) 8x
6: sc in 40 sts
7: (sc2tog, sc in 3 sts) 8x
8: (sc2tog, sc in 2 sts) 8x
9: (sc2tog, sc in 2 sts) 6x
fo.
Cheeks, make 2.
1: MR6
2: (sc inc) 6x
3: (sc inc, sc in 2 sts) 4x
4: (sc inc, sc in 3 sts) 4x
5: (sc inc, sc in 4 sts) 4x
6: (sc inc, sc in 5 sts) 4x
fo.
Tail
1: mr 4
2: (sc inc, sc in next st) 2x
3: (sc inc, sc in 2 sts) 2x
4: (sc inc, sc in 3 sts) 2x
5: (sc inc, sc in 4 sts) 2x
6: (sc inc, sc in 5 sts) 2x
7: (sc inc, sc in 6 sts) 2x
8: (scinc, sc in 7 sts) 2x
9: sc in 4 sts, sc inc in next st, sc in 8 sts, sc inc in next st, sc in 4 sts (20)
Rnd 10 Note: begin working in joined rounds.
10: sl st in next sc, ch 1, hdc in same st, hdc in next st, sc in 2 sts, sc inc in next st, sc in 9 sts, sc inc in next st, sc in 2 sts, hdc in 3 sts, join in beginning hdc.
11: ch 1, hdc in same st, hdc in 2 sts, sc in next st, sc inc in next st, sc in 10 sts, sc inc in next st, sc in 2 sts, hdc in 4 sts, join in beginning hdc.
12: ch 1, hdc in same st, hdc in 3 sts, sc inc in next st, sc in 11 sts, sc inc in next st, sc in 2 sts, hdc in 5 sts, join in beginning hdc, fo.
Shoes and Hips, make 2
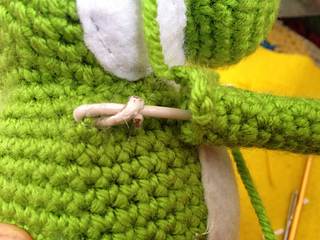
Soles of shoes are worked in mc and yellow felt sewn on later in lieu of yellow yarn for soles. 7th photo from top shows shape of felt as it gets sewn to the shoes.
Follow instrux for shoes from pattern linked to this project, switch to green on last yo before end of rnd.
1: sc2tog, sc in 2 sts, (sc2tog) twice, sc in 3 sts (8)
2: sc in 8 sts
Round 3 Note: Beging working in joined rounds.
3: sc in 8 sts, join in first sc of round, ch 1
4: sc in same st, (sc inc in next st) twice, sc in 2sts, (sc inc in next st) twice, sc in next st, join in beginning sc, ch 1.
5: sc in same st, sc in 11 sts, join in beginning sc, ch 1.
6: sc in same st, sc in 11 sts, join in beginning sc, ch 1.
7: sc in same st, sc in 11 sts, join in beginning sc, ch 1.
8: sc in same st, (sc2tog) twice, sc in 2 sts, (sc2tog) twice, sc in next st, join in beginning sc (8)
9: ch 1, sc in same st, sc2tog in next st, sc in 2 sts, sc2tog, sc in next st, join in beginning sc, fo.
Shell, Spikes, Eyes, and Arms
Shell is made same as in pattern but stops after 4 rnds. White felt is sewn on in lieu of finishing with white yarn.
Spikes are same as in pattern, whipstitched together before attaching to back of head.
Eyes, make 2
Worked in green and white felt sewn on with dark brown thread embroidered for pupils.
ch 4
1: sc inc in 2nd ch from hook, sc in next ch, 3 sc in next ch, rounding the corner to work in unused loops on foundation ch, sc 2 chs.
2: sc in 8 sts, fo.
White felt in 8th picture from top shows shaping of felt before it is sewn to the eyes (which have already been attached to the head). Notches go toward the nose, curved sides go toward top of head.
Arms begin same as in pattern, work 11 rounds after MR, sc in 3 sts, ch 1, turn, sc in 3 sts, fo. The extra short-rows are to make a shoulder to go smoothly over copper wire which has been inserted inside the arms.


 JennyTheKnit notebook
  handspun
 queue
queue favorites
 friends
 needles & hooks
 library