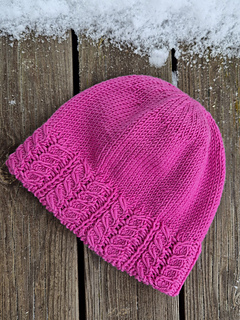
Another hat test for Jennifer Weissman. I love the double brim with the cable pattern.
My earlier test hats by this designer did fit me very well, so I was happy to test this one too. For this hat, the crown is shaped in a different way than her previous hats. Here we will work a larger number of decreases in one round, followed by some plain rounds between, while previous hats had visible decreases at four places. It’s easy to do and looks very nice.
The finished hat turned out great and fits me perfectly, as all the others by this designer.
Size 2: (Adult small)
Modifications:
No modifications made, unless that I started the crown 0.5 cm earlier (at 14.5 cm) than suggested in pattern. That is 0.5 cm more height than the previous hat I tested for this designer, but gave the perfect length for me with this crown construction.
My hat gauge and measurements, with main needle 4.0 mm:
My round gauge is spot on as in pattern, while my stitch gauge is tighter.
Unwashed:
Gauge: 22.5 sts/ 28 rounds
Height brim to top: 20 cm
Circumference: 44 cm
Washed, laid flat, dry:
Gauge: 22 sts/ 28 rows
Height brim to top: 20.5 cm
Circumference: 44 cm
Yarn:
Same yarn as in my previous hat test: link text. So I started right away, with the same needle sizes and wooden Lykke interchangeables (50 cm length with a new type of Lykke interchangeables, but the new cables were difficult to work with and scrolled up, so I went back to the old and straighter cable type, also 50 cm):
3.5 mm
4.0 mm
1 (50 g): 36 g used for double brim and joining round. 14 g left.
2 (51 g): attached after joining rnd. 30 g used for body of hat. 21 g left.
Used total: 66 g.
Cabling without a cable needle:
I found it easier always to hold the 1 stitch at the front for both left and right cables. For the right cable, one will need to slip the first 3 sts to RH needle, then slip the following stitch (4th st) to the front and let it hang there, while replacing the 3 sts from RH needle back to LH needle. Pick up the loose front stitch with LH needle, this is the 1 cable stitch and will be knit next. Knit these 4 sts.
Notes from designer:
Description:
Spriggy is a DK-weight beanie with cabled leaves circling the brim. The brim is lined with 1x1 ribbing that is knitted as you go and does not require seaming. This double-brim construction provides extra warmth while ensuring that the brim edge is soft and stretchy. The rest of the hat is worked in stockinette stitch.
A cable needle is not required for the brim (unless you prefer to use one).
Instructions are provided for three sizes -- youth, adult small and adult large. The height of the hat can easily be customized if you prefer a slouchy or more fitted shape.
Deadline: January 15, 2025
Sizes:
Youth (Adult Small, Adult Large)
Blocked Measurements:
Height (measured flat): 7.5 (8, 8.75)”/18.75 (20.5, 22) cm
Brim circumference: 15.75 (18, 20.25)”/40 (45, 51.5) cm
The brim circumference should measure approximately 3”/7.5 cm smaller than the wearer’s head circumference.
Blocked Gauge:
20 Stitches and 28 rounds = 4”/10 cm square in stockinette stitch on US 6/4 mm needle.
Yarn:
Approximately 170 (200, 240) yd/156 (183, 220) m DK-weight yarn.
Shown in Miss Babs Killington in the Frozen colorway (350 yd/320 m per 120 g/4.2 oz skein).
Needles:
US 4/3.5 mm circular needle, 16”/40 cm long, or two sizes smaller than size needed to obtain gaugeUS 6/4 mm circular needle, 16”/40 cm long, or size to obtain gaugeUS 6/4 mm double-pointed needles or preferred method for knitting small circumferences in the round, or size to obtain gaugeSpare circular needle, preferably two sizes smaller than size needed to obtain gauge
Notions:
Crochet hook and smooth scrap yarn for provisional cast on7 (8, 9) stitch markers, including one in a contrasting color or shapeTapestry needlePom pom (optional)
Difficulty: Advanced intermediate -- calls for provisional cast on, slip 1, 1/3 left cross, 1/3 right cross, knitting together the double brim, k2tog
Pattern Style: Fully written instructions, one optional chart, and a schematic diagram. Links to tutorials for the provisional cast on and cabling without a cable needle are included.
Testing needs: Please provide feedback on the clarity of the pattern and your satisfaction with the finished hat. Please create a project page for your hat that includes:
the yarn that you used and the quantity,the needle sizes,at least 2 clear photos of your finished hat after blocking -- please note that photographs are extremely important,the blocked measurements, anda link to the pattern on Ravelry once the pattern has been released.


 Lysstreif notebook
  handspun
 queue
queue favorites
 friends
 needles & hooks
 library