As my yarn is slightly thicker than the pattern I’ve increased my crochet hook size. I’ve chosen a size I would usually use for amigurumi when I’m working with this yarn, which is 3.25mm.
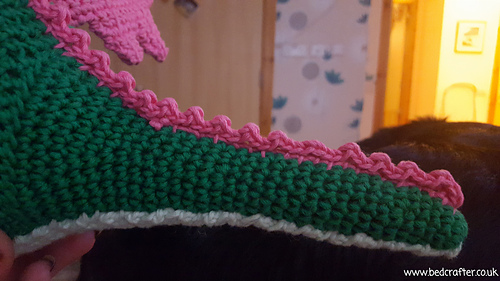
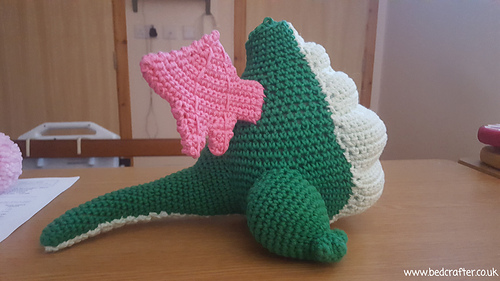
The colours for my dragon I have based on The Original Petes Dragon (1977). The colours aren’t an exact match as I had to choose from the colours the yarn I use produced at the time, but I’ve chosen as close as I can so I’ll say this dragon is inspired by. I hope to make another one day, hopefully finding another good cotton brand that has closer colours to the original. Still excited to see how this one turns out though!
I am following the pattern as it’s written but adding one change of my own, adding some pink hair given I am making a version that looks like Elliot from Pete’s Dragon. The only other changes are purely in terms of what colours I use and where, again for the same reasons. Further down I’ll include instructions on how I made his hair.
Pattern Notes
Row 20 - Is incorrect, it says inc, sc in next 24, inc with total stitch count of (26). It should read sc in next 22 to get the correct stitch count at the end.
Row 21 - Is incorrect too, so it’s instructions are like the last row only it’s sc in the next 26. Because the last row was wrong this one is too, so it’s actually sc in the next 24. This still keeps the correct stitch count that the pattern says which is (28). Now the pattern should follow on correctly again.
There was other errors in the pattern but sadly I forgot to log them after this as I wasn’t keeping notes like I used too (I was very ill at the time and using any energy on the making of this dragon). I do plan on making this pattern again so I’ll make sure to log the other errors then. Luckily any error came across I was able to fix myself.
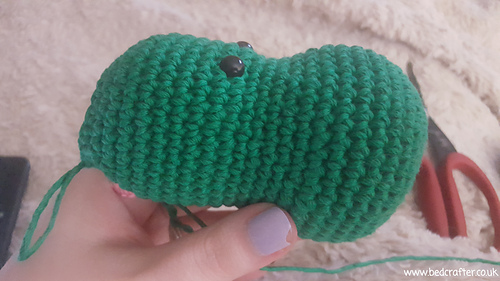
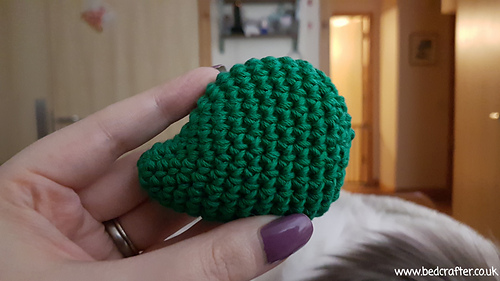
When making this Dragon I stuffed with fibre filling using my usual method of using tights/stockings which keeps the stuffing contained. There was a few parts of the Dragon I could not do this with, mainly the stuffing of the belly due to the way it’s done. By this I mean not the stuffing of the body but between the body and lighter green belly piece that was sewn on. I also didn’t use my usual method when doing the arms as it was such a small space to fill.
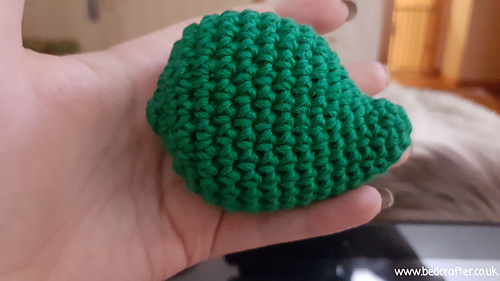
This Dragon is very detailed, so make sure you allow extra time for this as I found it took me longer than most amigurumi creations. All the details are worth doing though as it gives a really good finish.
When I came to making the face I did add a few tweaks of my own, as I felt giving it some shaping after would add to the look. By this I mean I used some yarn to pull in the area around both eyes so it had a dip so to speak, I felt this added to the finished look and made it look more real. I also did the same with the nostril area using the same technique. If your unsure what I mean if you look on you tube you will find videos showing techniques like this to add shaping to the eyes etc.
Once I had finished the Dragon according to the pattern I then went onto adding his hair. I knew of a few techniques I could try to achieve what I wanted, and I spent time doing some research on you tube to find the best technique for what I was after. I decided to try the amigurumi hair wig method and this seemed to work really well, it’s all down to the final trimming to get the look you want for the hair.
To make his hair using the wig method I used the basic instructions to making one from several you tube videos. The basic idea is to make the pattern of the head again to where you want the hair to finish. So you make a wig cap by doing this and then you add strands of hair into this before sewing onto the head. As I said there are a few good videos on you tube, a few sewn down the wig cap onto the amigurumi before adding the hair but I personally found doing it after gave me more control. I could easily check how it looked and whether I liked the finish look before sewing it down. For me this really came in handy as my first attempt wasn’t right, well it was fine until I started to trim the hair and this is where I messed up. It was ok though as I hadn’t sewn the wig cap down yet :-) I was even able to remove the hair strands and still use the wig cap I made, all I had to do was insert the strands of yarn again. Once your happy with the look you then sew it down in place and do any other trimming (cutting) you think is needed.
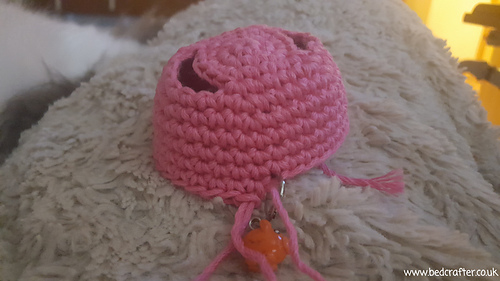
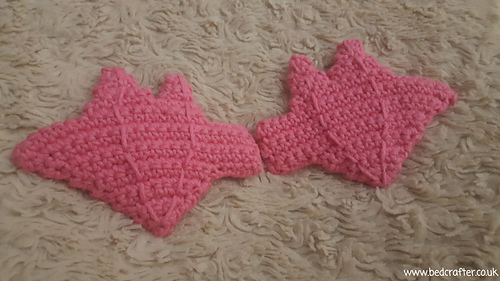
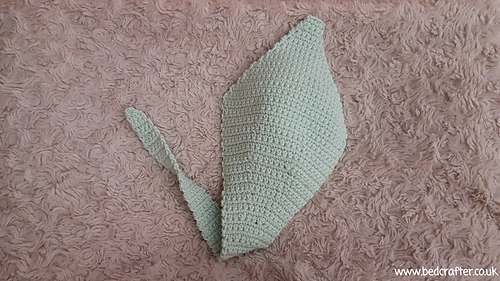
Now onto more detailed instructions, and let’s start with the cap. I adjusted her pattern as I needed the end of the head as the start of it is a different shape, to do this I basically had to reverse it. The other adjustment I had to make was room for the ears and if you want to make this you’ll need to personally adjust this for you and where your ears are placed. It should be easy for you to adjust from my instructions though :-) because as long as you keep the end stitch count the same it will work. I basically chained where the ears would be and then did stitches where they weren’t. It might sound complicated but it really isn’t :-) I hope both my instructions and photos I took will help you to achieve the same. So below is the pattern I used to make the wig, and if you need to adjust the length for yours it’s easily done (either taking rows away or adding a few rows, if adding just repeat the last row as it’s at the part of the pattern that repeats anyway);
Round 1: 6sc in magic ring. (6)
Round 2: 2sc in each stitch, repeat. (12)
Round 3: Sc, 2sc in next stitch. Repeat. (18)
Round 4: Sc in the next 2 stitches, 2sc, skip 5 stitches and chain 6, 2sc in next stitch, sc in the next 2 stitches, 2sc, skip 5 stitches and chain 6, 2sc in next stitch. (24)
Round 5: Sc in the next 3 stitches, 2sc. Repeat. (30)
Round 6-10: SC in the next 4 stitches, 2sc. Repeat. (36)
After you’ve made the wig cap it’s then into adding the yarn strands. To do this cut the yarn to the length you like, remember it’s doubled over so you want to do double the length you want. I went a bit longer than needed so it gave me options when trimming. You can either cut a lot of strands at the start or just make them in batches, I just did regular batches and kept going till I didn’t need any more. To add the strands to the hair you use your same crochet hook and go into the wig and out, you are basically looping in through. I am not good at explaining this but it’s simple and quick and you just go into every stitch. There are many you tube videos on how to make hair wigs with yarn so if you look at those it will explain better how to add the hair than I can. Other than this I put the wig on to decide where my parting was going to be, so I knew which direction to add the yarn strands in. I started with doing strands that sent towards me and then I turned it around and worked towards me again, so basically you had a horizontal line where the hair went different directions (like human hair with a fringe). I am sorry I am not good at explaining this part.
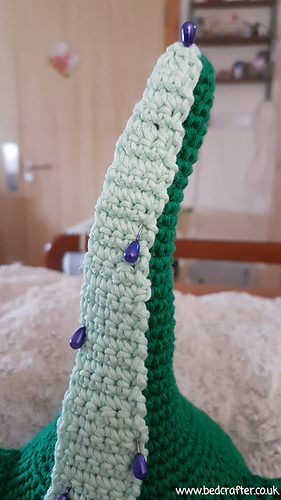
After adding hair strands I then trim to the look I want :-). Once I’m happy I then sewn the wig in place by working around the last round of the wig edge. You might want to secure it with a few other random stitches but I felt mine didn’t need it and the cap sat well on the head. After sewing down and letting the hair settle you might find you need to do a little more trimming. Other than this the hair is complete!
I have used the same hook size throughout and the same yarn. Any other questions please ask and I’ll do my best to help.
Yarn Notes
Pink Yarn used per pattern (before hair): 19g.
Pink Yarn including hair add on: 95g logged but I did have to do the hair twice to get it right. I would suggest you have at least one complete pink ball of yarn if you want to do simular hair, ideally I’d suggest having 2 balls so you have some back up as I can’t be 100% certain exactly how much I used given my first try had to be thrown away.
All other yarn used is exactly as stated in the information above this notes box.


 bedcrafter notebook
  handspun
 queue
queue favorites
 friends
 needles & hooks
 library