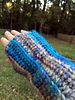
I wanted wristlets to match my Harlequin Cowl and Beanie, but could not find a pattern that would not clash with this pattern in a chunky yarn, so I came up with this one. You can use any yarn and any hook you like as long as they are compatible. You can also use any stitch pattern you like because you are just basically creating a rectangle. The short edges will be at your wrist and fingers, and the long edges will be at the inside of your wrists. You can make them short wristies or longer up your arm. It is up to you! I chose a DC in a ribbed pattern because I wanted it to be simple but distinctive.
Make your chain as long as you want your wristlet to be (from your fingers to your wrist or forearm), plus number of chains for turning chain -for example, I chained my desired length and then added 3 for my first dc.
Row 1: DC in 4th CH from hook and in every CH to the end. CH 2, turn.
Row 2: (CH 2 does NOT count as 1st DC here or throughout pattern), DC in Back Loop of 1st DC and every DC to end of row. CH 2, turn.
Repeat Row 2 until your work is wide enough to fit comfortably folded over you hand and wrist, omitting your thumb. You can measure the widest part or your palm with a tape measure, or just crochet until it feels comfortable to you. Remember that your yarn will stretch but do not make it too tight.
When you have your rectangle the width you want it, end off, leaving a long tag of yarn to join. With right sides together, fold the side edges together, and beginning at top edge, slip stitch the two edges together down to the thumb, or about an inch and a half. End off and weave in end. Drop down about two inches, leaving open the space for your thumb and re-attach your yarn and slip stitch to the end of your rectangle and end off. Weave end your ends.
Finish off any way you want at the top and bottom edges. I wanted it simple, so I just attached my yarn and evenly placed SC stitches around the finger and wrist openings. Weave in any loose threads and you are ready to go.


 debbiethurmond notebook
  handspun
 queue
queue favorites
 friends
 needles & hooks
 library