Overall
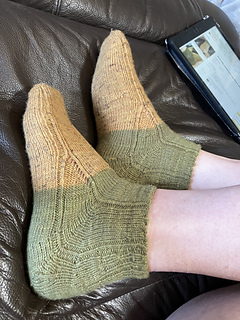
A resounding success! I couldn’t be more pleased with how successful this was!!! There are some things that I want to tweak and some variations that I would like to try out, but I really am over the moon with how comfortable and functional these are (although, I confess that I am yet to try them in shoes)
Xxxxxxxxxxxxxxxxxxxxxxx
Decided to use some leftover yarn from my Geogradient shawl to try out the numbers from my successful heel experiment in actual socks.
Two at a time, toe up, Magic loop
Kfb in second stitch and third last stitch on each needle for each sock used as the increase rounds in the toe.
JMCO 7 sts on each needle for each sock (14sts for the starting round)
Increase every round for 3 rounds (26 sts for the round)
17-11-2023
One plain round
17-11-2023
Two increase rounds (34 sts ea sock)
One plain round
17-11-2023
Two inc rounds (42st ea sock)
One plain round
17-11-2023
Work alternating inc. row and plain row until desired stitch count is reached, marking the middle column on the instep and twisting that stitch every round. Change ea column of stitches either side of the twisted stitch to purl. (58sts ea sock) Also mark central column on sole, to aid in keeping track of symmetry.
Do one row with incs on the sole only (60sts ea sock). Mark off the centre 25sts of the instep. Twist the column of stitches on both sides of those markers and change the column of sts next to these new twisted sts to purl.
Moved one stitch from each edge of soles to the instep needle so that I wasn’t changing needles b/w a knit st and a purl st.
20-11-2023
Gave myself a daily 10 round minimum in order to keep progress going through the “boring bit” b/w the end of the toe shaping and the start of the arch ribbing …
Work in established pattern until work measures 10cm. This is the length from the tip of my big toe to just after the ball of my foot. Insert some sole ribbing in order to hold the fabric close to the arch of my foot, as follows:
Round 1 - change the column of sts either side of the central column of the sole, to purl
Round 2 - work as established
Round 3 - add two additional purl columns to the ribbing, one either side (note - the columns should be added and reduced symmetrically throughout this part)
Round 4 - as established
Round 5 - add two more purl columns
Round 6 - add two more purl columns
Round 7 - add four more purl columns
Round 8 - as established
Round 9 - as established
Round 10 - reduce by four purl columns
Round 11 - reduce by two purl columns
Round 12 - reduce by two purl columns
Round 13 - as established
Round 14 - reduce by two purl columns
Round 15 - as established
Round 16 - change last 2 purl columns back to knit sts
Socks measure ~13.7cm when ribbing on soles completed (unstretched). From trying the sock on my biggest foot (which is my left foot), I think I need just a couple of plain rounds to get past the bump on the top of my foot and then it should be time to start the gusset.
22-11-2023
Ended up being four plain rounds b/w ribbing on sole and starting gusset. Socks measured ~14.4cm at that point.
Gusset
Decided that I wanted to make a little feature out of the gussets. Basically, I will use yos for the increase, placed every second round on the “outside” (ie the side closest to the sole sts) of the markers that are reserving the instep stitches. I also placed another marker to mark off the column of stitches that was originally next to the reserved instep sts. To make the gussets into triangles of reverse stocking st, ea yo was knitted in the row immediately following its creation, and that new column was purled from there until the gusset was finished. At that point, all gusset sts except the ones immediately next to the twisted columns were changed back to knit stitches.
Unfortunately, the sock was not quite long enough for it to have reached the location of my pivot points, so a few more rounds were worked as established, until that length was reached. I think that the length of the knitting at the start of the gusset probably needs to be ~15cm for me.
During these extra rows b/w the gusset and reaching the length for the pivot points, I arranged the stitches so that all of the stitches for the heel shaping were on the same needle (I had switched from magic loop to two circulars when the stitches became too many during the gusset incs). This meant that I put the stitch markers for the pivot points through stitches rather than on the needle so that they wouldn’t continually come off. I also placed the markers for the edges of the sole (19sts from each pivot point marker).
Short Rows
Work measures 19cm long when short rows are commenced
When I did the successful heel experiment, I’m pretty sure that my row gauge was less compact than what it is in these socks - ie, I am finding that I need more rows here to go a certain vertical distance. Because of this, I will put an extra short row into the initial section. In the experiment, I did 5st, 4st, 2st b/w turns. This time, I am going to do 3st, 3st, 3st, 2st. NB: there is also an initial short row encompassing all of the heel sts
23-11-2023
I had considered doing the two separate parts of the initial compound short rows (ie the first part with one slope and second part with a different slope) on different rounds b/c then it would be easy to do a second lot of short rows over one of these parts if it was necessary. However, I then figured that if one of the parts needed a second lot then it was likely that that would also be true for the other part, so I continued with my original plan of doing them both in the same round and just changing the rate at the marker so that the last turns, between the markers, are all 2sts apart. After doing the first heel, it is very apparent that another complete set of short rows will, indeed, be needed, possibly even incorporating a few more stitches from the sole in order to have enough length under the heel.
23-11-2023
Decided that I would do 6st, 5st spacing (after the initial short row on all heel sts) for the first part of the second lot of short rows after reassessing the fit and realising that not as many additional short rows were needed, and then go back to the 2st spacing as for the first complete set.
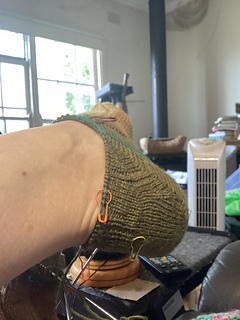
…well, as it turns out, I didn’t need anywhere near as many short rows as I thought! See photo. I am now a considerable amount past where I wanted to be for the actual heel turn. Mind you, the fit might change once the gaps are closed, so I will need to reassess once I have done that. I am thinking that it might not be a bad thing, though, b/c I might be able to forego some additional short rows in the vertical part of the heel.NOPE! The photo was taken prior to closing the gap on the second side. I tried it on again after that had been done and the heel length on the sole was pretty much perfect.
Back of heel
The inverse short rows were done every two sts from the sole edges to the pivot points. I placed the CDDs next to the sole edge markers, starting from as soon as enough sts had been incorporated into the inverse short rows. A total of three sets of CDDs were used (one ea side x3). A second set of inverse short rows were then done over the same stitches, turns ev. 2sts. Four, total, purl columns were inserted, centred on the middle of the heel, to create some ribbing, during these short rows.
Contemplated doing around 3 more short rows (widely spaced turns) but decided that there was a distinct risk of bringing the back of the heel up too high, which would create an area that wants to fold over and create a ridge (which would be bad). In addition, when the sock was on my foot at this point, if I pointed my toes the heel covered all but one of the creases and was running pretty close to parallel with the longest crease. I think this probably means that it is high enough in the back and no more short rows are necessary.
I can now add the decreases needed to get back to 60sts. This was done via two sets of two CDDs, in line with the ones further down.
25-11-2023
Looking at how it is fitting, I’m wondering whether it would be worth testing out having the CDDs in the actual heel shaping placed just 2 or 3 rows higher … it might not make much difference, though … or it might make the turn a little bit pouchy… or it might be an improvement - not sure …
24-11-2023
Moved four stitches from ea end of the back needle for ea sock onto the front needle
26-11-2023
After much deliberation, I ended up ripping back to the last CDDs (after the short rows were finished). The sock was pulling too tight at that point. After undoing that last set of decreases, I turned the column of sts from the decrease (closest to the centre back) into a purl column. then I worked 6 rounds as established and decreased the remaining two knit columns from the decreases into one column. This means that the total stitch count for the round should still be 2 above what it was initially at this point.
Decreased the final two stitches (back to 60sts for the round) 6 rounds after the previous decrease. I did this decrease in the stitch columns that originated in the gusset increases b/c all of the columns further towards the back were involved in 1x1 ribbing at this point and I would prefer not to disrupt that. At this point, the top of the knitting was sitting just at the top edge of my medial malleolus (ankle bone).
Top Edge
I wanted a folded picot hem. I did two rounds after the final decrease then put a marker through the first stitch of that last round and knitted 8 more rounds. This was followed by a full round of k2tog, yo. This round forms the fold and creates picots.
On the reverse of the hem, I wasn’t sure what to do to avoid the hem being too bulky where the ribbing is situated. Maybe having stockinette lining the ribbing and ribbing lining the stockinette portions will work???.
I ended up trying out p2tog, yo for the folding round, thinking that the purl bumps might form cute, pointier picot’s than k2tog. I was totally amazed to see that the purl bumps for the row have somehow disappeared!!! Very interesting! The picot’s are still great, though.
On the facing, I ended up doing plain stockinette across the front needles. On the back needles, I started out with full 1x1 ribbing for a couple of rounds then changed to gradually more stockinette from the centre out, leaving ribbing at the edges. The hope was for the stockinette to sit in behind the ribbed portion of the heel. I am hoping that the ribbing will sit in against the skin in the hollows behind my malleoli.
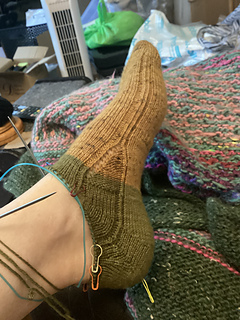
After watching some videos, I decided to graft the edge down … oh my Lordy, did it take a very, very long time!!! The stitches are tiny and very difficult to see! I actually had trouble determining what would be the best tension for the grafting. The first one, I pulled the yarn fairly firmly but made sure that there was enough to stretch with the fabric. The second one, I allowed to be very loose. From the right side, the one that I pulled firmly has a much more obvious horizontal line indicating which round the hem was grafted to (see the third photo from the top). On the other hand, I think that the one where I pulled firmly has the two layers of the fabric laying vertically against each other in a better way. Time and more practice (and washing and wearing) will hopefully let me know which I like more.
I would like to try
- Moving the gusset incs to be just above the column of stitches that ends up being the edge of the sole - I think that means it is the column that is initially 9sts away from the reserved instep stitches
- Maybe trying the initial CDD centred over the column that was the edge of the sole
- Maybe trying the rest of the decreases stretched out vertically more (???repositioned horizontally, too). I am wondering whether having them clustered too low could contribute to the tension in the fabric wanting to pull downwards over time. This effect is not actually evident currently, but I have wondered.
- Forego the ribbing behind the ankle (at least until above all of the short rows are completed.) If my measurements and stitch calculations are correct, the ribbing should not be needed down that low. In these socks, I think it actually made it a bit more difficult to tell when the decreases should occur. I am also wondering how the ribbing texture will feel there in a shoe. If the extra ribbing is needed at all, it shouldn’t be until the sock is just covering my ankle bones - I think that is where the narrowest point is.
- If I do a folded hem again, I would like to see whether very loosely binding off every second stitch and then only needing to graft the ones still remaining live would give a satisfactory result.
- The toes feel slightly roomy. I don’t know whether I increased too quickly and/or the socks are too long (by a couple of millimeters). I haven’t washed these yet, though, so the fit in the toes now might not be quite the same as it will be after washing. These issues should be very easy for me to adjust for in future projects if they don’t resolve with washing.
Note: I am wondering whether blocking of the picots could be facilitated by threading a length of normal sewing thread in under them b/f washing, then applying a little bit of tension to the thread during drying. It might help the hem behave itself more generally, too. I don’t want to actually block the rest of the sock b/c I want it to have a decent amount of negative ease.


 felicitymcrowe notebook
  handspun
 queue
queue favorites
 friends
 needles & hooks
 library