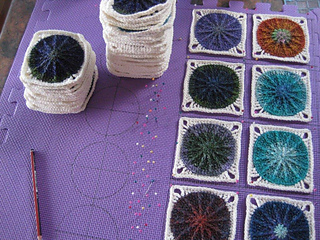
To spiral or not to spiral, that is the question……
I noticed (as others have done) that some people have spirals instead of straight spokes on their circles. I did 10 circles before I noticed I was spiraling out of control! I then did a “straight” circle which looked so much better than the spirals because the dc’s in between the posts on each round appeared to be slanted on the spiral ones.
Needless to say the perfectionist in me frogged 10 circles.
How not to spiral…..
In rounds 3, 4 and 5 the number 1 dc after each front post dc tends to nestle in behind the front post dc just worked and can be easily overlooked causing the next stitch to be counted as the number 1 stitch in a set as you crochet to each post. In this case you will end up with the last dc worked (before you execute a front post dc) falling 1 stitch past the post each time instead of directly above it - hence the spiral effect.
If in doubt as to which stitch is the number 1 stitch of a “set”, count backwards from the post ahead so you can identify it more easily.
Steam block the circles before doing rounds 6 and 7.
I also blocked the squares before seaming - it’s worth the extra effort. You can see in the photos that I penciled the shapes onto the mat for consistency in size.
Edging
The pattern edging was too “flimsy” for my taste as I felt a more substantial and weighty (but unfrilly) edging was more fitting for such a beautiful pattern. I used border #9 from the book Around the Corner Crochet Borders which I was able to borrow from my local library. The e-book is available on Ravelry. I followed the edging pattern but did 6 rounds of the lattice work and substituted a crab stitch edge for the picot (1ch, 1 reverse sc).
Flat crochet seam
http://grumpygirl.blogs.com/home/2007/08/tutorial-the-am....
Hooks
3.5mm circles
4mm white borders
4.5mm Crab stitch outer edge
I hope you found these notes helpful!