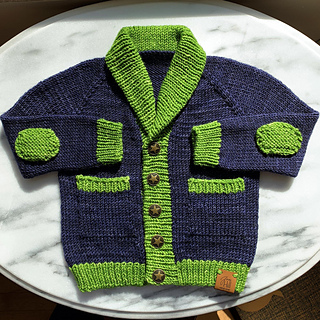
I love this little sweater. I would like to knit it again with more grandpa-ish colors next time. Lots to learn with this pattern. Many notes and links in here. I modified the elbow patches to my liking. Extra rows on collar/button band. Tubular bind off on ribbing. Plus more mods on pocket.
09-18-2018
Christin chose the colors and the yarn from my basket of swatches. I do like them. I think it will be cute. Benny didn’t want to let go of the Navy, he likes it! The green is so cheerful.
Starting with
219g Navy Yarn
93g Avocado Green Yarn
Ending with
73g Navy
25g Avocado
09-26-2018
I added stitches for the pockets as I knit the sweater body. To do this, just for these stitches, I switched to a US5 needle as I find it looks better in the end to go down a size with this method. I kfb where I wanted the pockets (following the pattern location). Immediately after kfb I went back and placed one stitch on my US6 and one st on a stitch holder, alternating as I went. Now I have my bottom pocket stitches ready and waiting.
So I’m about ready to bind off the hem. I want to do an invisible/tubular bind off. I have done this before, but not on a cardigan. When I did it before it was just straight k1p1. So I was wondering what to do with that extra selvedge K stitch on either end of the row. It won’t be seen, but it has to get bound off. So my solution is that on the first set up row before bind off, I will purl that stitch and then turn the work over and I will then be back to k1p1 all the way across.
This is the video I follow for tubular bind off.
Yup, that worked.
09-27-2018
Discovered a dropped stitch in the body of the sweater. This is long after I’ve knit ribbing and bound off. The bummer is, it’s in the front near the edge by the pocket. A highly visible spot. I don’t know how my ribbing turned out okay in the end with a missing stitch. Anyway, I fixed it and I think you’d be hard pressed to find it. Here is the video I used to fix my dropped stitch after bind off.
09-28-2018
Sleeve notes:
Picked up 2 extra stitches on underarm and decreased the next round. Worked 15 rows before starting sleeve decreases.
Worked 3 decreases as pattern states, but did not do the 4th decrease. So I had 34 stitches. My stockinette in the round is a little tighter than straight knitting. So in order to keep the sleeve loose for pudgy baby arms, I didn’t do that last decrease.
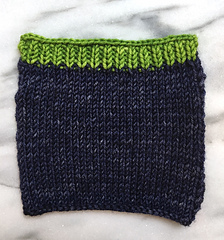
Knit 20 more rounds (6.25” from underarm), switched to green and US5, K 1 round. Then 9 rounds k1p1 and then start set up for tubular bind off. In the round, you do the first set up k1, slip 1 (the purls) all the way around and then the second round slip 1 (the knits) p1 all the way around. Then you do the bind off as in video and when you get to the end you’ll connect the last purl to the first knit. It is the perfect little ribbed cuff and if it gets to be too long after wetting the merino, it can be folded up and still look good.
09-29-2018
Two monkey arms done! I made the sleeves about 7.75” long because B’s limbs are on the longer side. C thinks he’s going to have monkey arms.
On to the button band and collar. Going to do German Short Rows instead of W&T.
10-02-2018
I’m at the point in the pattern where it says to do the buttonholes. However, it looks like I need another row or two on the button band as it is very narrow at this point and will be much narrower than the other ribbing. I hope adding some rows doesn’t make the collar too big. I really do not want to have to rip back and have to sort out all those stitches. Well, it’s a baby sweater. No biggy, on we go. First I need some buttons!
Three stitch buttonhole seems like it would be large for a 1/2” button as the pattern calls for. I think it’s unlikely that I will find 1/2” buttons I like anyway. That is small.
So, I’m wondering what is the benefit of a 3 stitch buttonhole rather than just a yarn over? Yarn over is so much simpler and accommodates many sizes of button. I can place it in the purl stitch to hide it a bit too. I keep seeing references to “this buttonhole is sturdy” and I wonder what are people doing that they need a sturdy buttonhole? I’ve never had a buttonhole have a problem. 
I have to admit, the tutorial tincanknits gives for making the buttonhole is not helpful to me. I found this video and I think the technique is really for me. A different technique mind you. You put the buttonhole in the purl rib and it still looks nice when the cardigan is unbuttoned. I keep seeing it said this or that technique isn’t a very pretty buttonhole, but the button covers it. Yes, but only when you button it! Isn’t that the point of a cardigan that you can wear it open? Even though a YO buttonhole would be more than adequate, I think I’ll try this so I know for future projects. Another link to this video, has the instructions written out too. Instruction starts at 1:29
10-04-2018
Did 2 additional rows before buttonhole row.
10-06-2018
Came across this cool bind off Cable Bind-Off for Ribbing. Not stretchy, but decorative. I used this for the pocket ribbing. Note, it only looks good on one side. Very easy bind off to do.
This is a very helpful listing of different bind offs. Check it out.
Also, this fake tubular bind off. I wish there was a video for it. I would consider this for the button band and collar, but it says it is one sided. No pics of the wrong side.
10-09-2018
Did tubular bind off on the button band and collar. I did 4 set up rows instead of 2 (my usual) because it needed another row. Totally unneeded otherwise. I prefer 2 set up rows on a tubular bind off. Four makes it a little bulkier than I want. It’s okay though.
Tried the tubular bind off on the pockets and didn’t like it for pockets. It was a little too rounded on the ends. Ripped it out the next day and did the Cable Bind Off for Ribbing. Much better.
Now I just need to knit elbow patches, seam pockets (ick!) and weave in ends. So many ends for such a small sweater!
Benny is 11 months old today! Time flies. I’m going to see C & B in 5 days and want to give it to him then. The weather is turning cold and I want him to get use of it while it fits! No need to hold on to it until his birthday next month.
10-10-2018
Ugh. I don’t really like how these elbow patches came out. They’re sort of wonky. The increase side is not as tall as the decrease side. The first one I did long tail cast on and knit as written. I really didn’t like how one of the edges and the cast on edge looked. Second one I did cable cast on which looks more similar to the cast off edge and slipped the first stitch for nicer edges. Still, the height of increase portion is less than the decrease portion. Not sure this would add to the sweater overall. It may detract to put not good looking details on there.
Gonna think on this a bit. Maybe garter st? Maybe some short rows?
10-10-2018
All knitting done. Pockets seamed. Ends are weaved in. No elbow patches yet, but those are optional, so I’m calling it done and I’ll update if I do elbow patches. Sweater soaking and will post more pics after blocking.
10-11-2018
Elbow patches! I made some elbow patches I like.
Mods to pattern:
Cable cast on
Garter st
Lifted bar increase
6 rows between increases and decreases
These look much nicer. Even on increase and decrease side and nice and flat.
10-23-2018
Ended up with these buttons. They seem just the right size for my buttonholes. The first star buttons I bought, turned out to be 15mm when the listing said 17mm. You wouldn’t think 2mm would make a difference, but it did. Too small. So then I got more buttons from a different seller (linked above) and the ones I’m using are 18mm and I also got even larger ones, which don’t fit thru my buttonholes.
11-04-2018
Final measurements after blocking:
chest under underarms: 22”
armpit to hem: 7”
armpit to sleeve cuff: 7.5”
upper sleeve circumference: 7”


 jenhp notebook
  handspun
 queue
queue favorites
 friends
 needles & hooks
 library