XL: Chain 73
Row1: dc into 4th chain from hook(=2dc). 4dc + sk1+4dc12 + 4dc = 58
Row2: ch3 + 4dc + x + 4dc = 81
Version 1: Test version - Just do the shoulders and the hood, to see how it works / fits together / looks. And if it justifies the purchase of more yarn.
Also if a pattern can be added to the simple dc of the hood--perhaps crossed dc.
Version1a: add simple pattern to shoulders.
Version 2:
Stop after 2 rows of the lace pattern = the pattern in the diagram with no repeat
-> capelet not cape.
Possibly use black yarn of similar weight for trim.
03-30-2018
Puzzle Yarn Version #1
Row #1 58 dc
+23
Row #2 81 dc
5 rows incrementing 12 each row, should end with 141 stitches.
3: +12 -> 93
4: +12 -> 105 (8 times 12= 96, +9 so:)
5dc + ( 3dc + 2into1 + 3dc} times 12 + 4dc
5: +12 -> 117 (9 times 12=108,-117=9, so:)
5dc + { 3dc + 2into1 + 4dc } times 12 + 4dc
6: +12 -> 129 (12 times 10=120, so:)
5dc + { 4dc + 2into1 + 4dc } times 12 + 4dc
7: +12 -> 141 (12 times 11=132, so)
5dc + {4dc + 2into1 + 5dc} times 12 + 4dc
Next, 5 rows incrementing 6 each row.
Should result in 171 stitches in row
5 times 6=30, 30+141=171 - check.
Instead of all the mathematical calculations:
To increment 12 stitches evenly, attach 12 stitch markers to the row. Then dc along the row, and when you meet a stitch marker, do 2 dc into 1.
Use same method for any increment - just use the correct number of stitch markers.
04-04-2018
Stopped at ACMoore the other night & found another Puzzle yarn of the same color AND lot number. $5 on sale. (though it was normally $8 and I had a 1/2 off coupon, so I kind of lost a dollar on the deal.)
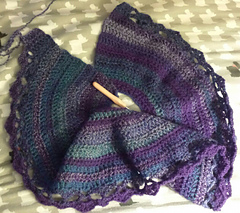
Both of these gigantic skeins are still not enough yarn to complete the cape according to the pattern spec. But I’ll continue with the plan of finishing the cape part down to the bottom of 5 plain rows of +6/row -- just before the interesting lacy pattern part. Then start on the hood part at the top.
I’ll decide what to do with the interesting lacy part when I see how much Puzzle yarn is left. Since it is a variegated color, buying another skein with a different lot number might be OK. I’ll see if it’s worth it--that is, if the rest of cape+hood looks good, or if I’ve messed it up too much.
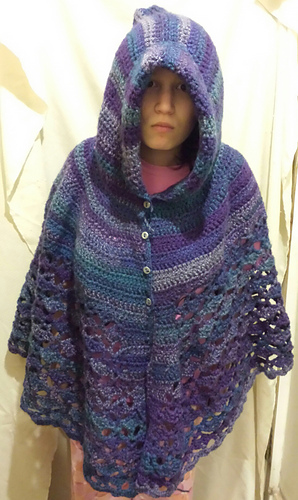
Another possibility is to button on a matching cloth bottom for the cape. Say a shiny blue satin. My daughter wants to use the cape in a class production of Midsummers Night Dream.
Finishing - thinking possibly of doing lace up instead of buttons. Will see when I get there.
Also thinking of making Sculpy buttons. I may have some silver sculpy.
If the pattern works out, then worth trying with the red yarn, if I’m still in the mood. There I could have a problem with lot #. But maybe the red cape could just be a hooded capelet. Or possibly have a buttoned-on cloth bottom or use a different color for the bottom part of the cape.
To be continued…
04-09-2018
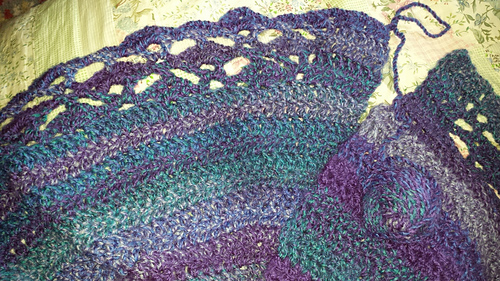
Here’s a way to understand the “fan pattern” at the bottom of the cape:
It is made up of alternating rows of “big shell” and “small shell”.
big shell = 2dc 2ch 2dc all into the same stitch
small shell = dc 2ch dc into the 2dc space of the big shell of the previous row.
cont.
04-09-2018
The first row of the fan pattern is a “big shell” row.
After the beginning 4 normal dc’s, the diagram wants you to begin with half of the big shell pattern. It shows 1 ch, 2 dc into the same stitch, skip 2 below & then a sc.
After that, the pattern is repeated:
ch4 sk2 sc ch1 skip 2 small shell ch1 skip 2 sc
The second row can be seen as a reaction to the previous row:
dc into the center of the previous row’s big shell, ch3, then small shell into the center of the previous row’s ch4 then ch3 and repeat.
The third row is like the first, except it is now floating on the 2nd row instead of going into a dc base.
In reaction to the small shell row, the big shell row has this pattern:
sc into center of ch3, ch1, then big-shell into the center of the previous row’s small-shell. ch1 and then sc into the previous row’s ch3, then ch4 over the top of the previous row’s single dc (which was on top of its previous row’s big shell).
Row 1 of Fan pattern - big shell
The diagram wants you to start and end with half of the big shell - i.e. ch, 2dc, ch, skip 2, sc.
After that, the repeating pattern is:
ch4 sk2 sc ch1 big-shell ch1 sk2 sc.
big-shell = 2dc 2ch 2dc
04-09-2018 Row 2 of Fan pattern - small shell
dc into the (half) center of the previous big shell
Then repeat:
ch3 small-shell (into center of previous row’s ch4) dc (into center of previous row’s big-shell)
You end this theoretically into the center of the 1/2 big shell that ended the previous row.
small-shell = dc ch2 dc
04-09-2018 Row 3 of Fan pattern - big shell
here you’re reacting to what is in the small shell row below.
The pattern thinks you start with ch2, then sc into the ch3 below, then sc.
The repeating part is:
big-shell (into center of small-shell below) ch1 sc (into center of ch3 below) ch4 (over the top of dc below) ch3.
or
big-shell ch1 sc ch4 sc ch1 repeated.
After that, you alternate row 2 row 3 until you’re at the bottom of the cape.
04-09-2018 next time I make this, to increment
Since the back and front form more of an oval than a circle, won’t it make more sense to add the increases somewhat clustered where the shoulders would go?
That is, somewhat follow instructions for crocheting an oval. e.g. the classic braided rug look.
04-10-2018 purchased more yarn + premo
Stopped at AC Moore on way home.
Bought another skein of the puzzle yarn using a 55% off coupon.
Same color, but Lot # 4545. Should be okay since color is so variegated.
Also bought a 2oz block of Sculpey premo! Accents, Silver #5129.
For the buttons. I hope. :-)
04-11-2018 How To Crochet Together Top of Hood
Here’s a video from the DROPs Website:
https://www.youtube.com/watch?v=Oy5JZQrH6MI
Note how it starts:
You get to the end of the row before folding.
You get a loop around the hook & create a chain.
Then you push the hook through all 4 loops of the 2 sides of the material (although this pattern says to sew through the “outer loops only”, so maybe do that instead.)
Then you get a loop onto your hook and bring it back through the 4 loops of both sides of the folded piece.
Then you crochet a single crochet over where you just did the “through” crochet.
i.e. through all 4, pull it through, then pull another loop through on top. Repeat until the end.
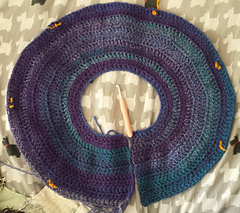
04-12-2018 Crochet Folds of Hood together
I crocheted the hood together using the outside loops.
If you look at the photo with the yellow arrow, you can see that on the right there’s a faint pattern of 2 parallel lines that results from crocheting the other side using only the outside loops.
The arrow points to a transition where I did a few stitches going through all 4 loops to see how that looked.
I preferred the pattern with the 2 parallel lines, so continued to do it that way.
I tried on the hood and think it may look better if I fold it kind of in a hem and sew down the hood hem as a continuation of the pattern that goes along the edge of the band. We’ll see then.
04-13-2018 or sew buttons on the hood
The edging could go along the edge of the hood, and I could sew buttons to give one the option of folding back the hood and holding the fold back by buttoning to the edging.
04-30-2018 Sculpey Premo! Accents buttons
https://www.instagram.com/p/BiMRQWNBXVE/


 handspun
 queue
queue favorites
 friends
 needles & hooks
 library