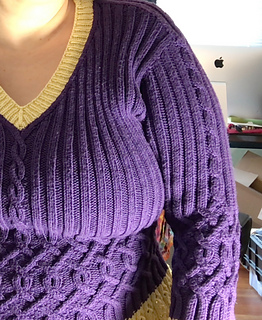
I have a certain “Why do X when I could do Y?” attitude towards many things, including knitting. It doesn’t always work. But at this point I have a pretty good idea how to flatter my shape. I have a somewhat short waist, so decreasing after the bust and increasing again for the butt would have to happen in a very short space. Instead here I use cables for waist shaping. Then I have to go and make a searing color contrast with lace for the trim, just because.
ga swatch:
20.5 stitches
32 rows x 4” (29 rows unwashed)
That’s 10% shrink on the rows.
measurements on existing sweater: 19” across the shoulders. 9” neck opening (before edging)
tiny saddle:
The saddle is just k2, p2, k2 with a selvage stitch on each side, so k3, p2, k3.
27 st | 42 st: | 27 st
39 rows | 56 rows| 39 rows on the side.
There are 24 knit ribs across the back, 26 in front.
That is: knit the ribbing for about 39 rows, then bind off four stitches and knit the one rib for 42 rows, then cast on four stitches and knit 39 rows.
Cut yarn and pick up for the back, 27 stitches on the right, 42 stitches in the center, and 27 stitches on the right.
The center two stitches of the back are purls, giving an even number of ribs total, beginning and ending with k3 for the outer rib plus selvage stitch.
And just keep knitting until it’s time to shape the bottom of the armholes.
The circumference of the sweater at the bottom of the armholes should be 40”. With a 19” cross-back measurement at the top, the back has to expand to a width of 21” (extra inch for ease). That means 1” or 5 increases (I used kf&b on the last stitch of the row) at either end. That’s 10 rows.
Knit the back for 45 rows before doing 10 increase rows, making the back about 65 rows long.
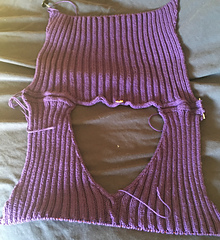
For the front I picked up 27 stitches at each side and knit both sides two at a time, kind of like socks. It ensured both sides were symmetrical. To get the smooth appearance of the rib from the saddle pouring down the neckline, the first/last two stitches picked up on the neck side are picked up from the two cast on/bound off stitches of that rib.
There are three short row turns to slope the shoulders.
Front width ease for bust provided by adding an extra pair of ribs at the V neck. That’s 8 more stitches, or an inch and a half. The ribbing has lots of give.
Then I joined front and back to knit in the round. Each armhole has four cast-on stitches, which establishes the rib pattern there.
Did 14 short row turns after peak bust.
Then I made some cables, as shown. As there are an even number of ribs, the pattern works out just fine in the round providing you move your beginning of round marker a couple of stitches ahead or back when it interferes with a cable cross.
03-25-2023
Note on first photo: There is an extra rib on the right side (oops) and the number of ribs at the back center is too many (see how the neck ruffles?) so I started over. All good.
The body took about three skeins.
Peplum
I have k2p2 cables established for the body. After I changed to the contrasting color I knit three rounds.
Then I put a yo in between the two knit stitches and knit a round plain. I now have k3p2 ribbing.
On the next round I k1, yo, k1, yo, k1 in the knit ribs and knit a round plain. k5p2 ribbing.
I started the pattern Barbara Walker calls “Cloverleaf Eyelet Rib” on page 170 of A Treasury of Knitting Patterns except I reversed the order of the pattern so that the eyelets form an arrow pointing up instead of down as this is a top-down sweater.
I knit three complete repeats of the Eyelet Rib and had just enough yarn left for Jeny’s Stretchy Bindoff. Righteous game of yarn chicken, that.
03-25-2023
General photo note: Those are the same piece of knitting in different lighting. It’s all the same color, really.
03-27-2023 Sleeve note
It’s crucial to have an even number of ribs on the sleeves (body too, but that’s naturally doubled). I had an odd number so made a very small underarm gusset to reduce one away.
03-31-2023
I just re-did the first sleeve yet again (third time is charm). The cables do pull in at the elbow, but not that much. Out of 22 ribs I decreased four under the arm, giving the sleeve a nice taper. It feels a little long, which means it’ll be more or less right after it shrinks about 10% in the wash.
03-31-2023
I just noticed that my cable pattern, which I sort of free-handed, shows up in A Treasury of Knitting Patterns as Serpentine Cables (P 286) . There’s only so many ways to permute over k2p2 ribs.
04-06-2023
What I’d do differently next time:
The upper body is a bit too wide. The sleeve cap starts down the arm a bit. It looks fine except maybe to people who really know how to make sleeves.
Next time I’ll make the upper body narrower and the lower area leading to the armholes wider, with more stitches cast on under the sleeves.
04-06-2023
I tightened up the back of the neck with a crochet chain on the inside, where it doesn’t show. The sleeve caps are a bit less droopy now.


 tigerbalm notebook
  handspun
 queue
queue favorites
 friends
 needles & hooks
 library