This is my most ambitious project. Initially started with the US 10’s recommended in the pattern, but found the gauge too large, so I went down to US 9’s and made the gauge.
I skip for a curling team, and this is my first year as skip. Curling ice has gotten a lot warmer with the invention of in-floor refrigeration, so when I play as lead or second I don’t need anything warm. Now that I skip, I’m pretty cold standing around in the ice shed! Time to make a proper curling sweater.
I’ve started on the ribbing for the back panel, but I have a lot of modifications to the decoration, i.e. the colourwork, so I’ve had to stop and really think it through before I go too far. I’m not even sure I want the base colour to be white! The indecision is killing me.
Modifications I’m considering:
- substitute my last name across the yoke instead of the maple leafs in the pattern
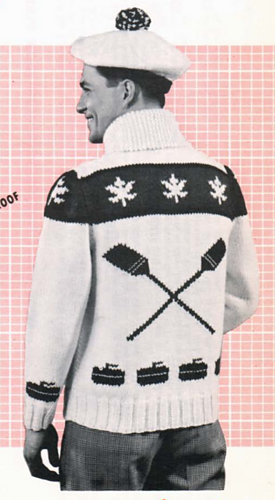
- omit the brooms from the front. The best curling sweaters I’ve seen are the cleanest ones.
- replace the brooms on the back with a simplified version of my club’s logo (http://rccc.on.ca/wp-content/themes/RCCC/_images/rccc-log...) No banner, no rock.
- add a dark double-stripe inside all the ribbing
I plan to make a lightened photocopy of the pattern and go to town with some coloured pencils to figure it out.
05-11-2015
I’ve chosen my colours, at least most of them. I still have work to do to transpose the imagery on the back that I want into the pattern, but in the meantime I can make progress all the ways to the top of the row of stones at the bottom on the back of the sweater.
I only have one skein of each colour, plus an extra white at the moment. The rest is on hold at Romni until Nov 20.
Next step: move up to No. 9 US needles and knit 6 rows stockinette.
Meantime: work out mid-back colorwork pattern.
10-11-2015
Last night I tried to finish the stones on the back, but I goofed up working in the edges of the intarsia and had to tink back 3 or 4 rows worth. I went to bed about 0200 quite disappointed.
Today I managed to do it right, or at least right enough to be satisfied with it. I’ve gotten past the rocks, including the handles. I had to make a decision on the handles, so I went with red-gold-red-gold. I think it looks good.
The “strike band” of 1 row in “sheep’s grey” was a huge PITA, but the result is well worth it! I’m pleased.
Now I’m realizing I have to actually count the rows because it’s a bunch of straight white stockinette up to the next design.
My other challenge is finalizing the design changes I’m working on for the back. I’m realizing it may have been a mistake to start with the back, considering that’s the one part where the design is not finalized. I could have made tons of progress elsewhere, but now I’m stuck until I get that done. Oh well - motivation!
I also have a lot of work to weave in all the ends, so there’s still a fair bit of mindless work to do before I come up against the design changes.
19-11-2015
I had made it to about where the brooms cross when I noticed one of them was off. Frogged 14 rows. Put back 9. It was pretty depressing, but I’ve done a better job of joining the colours this time. I had a couple holes I was going to fix with a darning needle, but now I won’t have to do that. Also, some of the stitches at the edges of the colours were loose and that made the image a bit weird. It just looks more solid now.
Worth it.
24-11-2015
Huge progress over the weekend has brought me past the maple leaf/broom motif and through the arm decreases. Things went very quickly for the last 10 rows before the yoke.
The yoke colours have been a point of indecision for me. I’m going with “seafoam” (dark grey) for the edge stripes and “sheep’s grey” (beige) for the background field with “rust” (red) lettering. The more I work it, the more certain I am that it will look great.
I’ve begun the lettering to put my name in the back and it’s very intensive fair isle work. Progress is frustrating and slow.
Because the stitches are so large, I’m sticking to a strict 3-stitch rule and even then the floats seem large. The sweater is full of floats, so I might have to make a liner.
I’m not entirely certain it’s a good idea to continue given there are some 8-stitch runs of a single colour. Will the fabric be strong enough? Will there be holes? Wrong colour showing through? I’ve resolved to complete at least half the height of the lettering before making a final decision.
Meanwhile, I’ve begun work towards making charts to have the number “21” put into the shoulders. I should probably take care to use the same font as I did on the back.
I intended to simply remove the “leafs” from the original design on the front panels of the sweater, but it’s been suggested that will leave the sweater a bit naked. I’m inclined to disagree, but a specific suggestion was to put a crown there because I play at the “Royal” Canadian Curling Club and the club logo, which the design on the back is modelled after, includes a crown. I removed the crown from the back because it just would have been too busy back there.
I also have to start considering how to work in the double-stripe of gold I want in the shawl collar. The pattern doesn’t call for any colour work in the collar, so there’s no chart for it, just written instructions. I’ve seen double-stripes in other curling sweaters and I like it.
Lining tips/notes:
25-11-2015
NOTE TO SELF:
- Baste the sweater together before knitting up the shawl collar or doing any lining. This will let you figure out where to put the stripes.
- Try to find free cardigan patterns to help figure out the collar stripes
- consider quilting on silk lining to each piece before stitching the pieces together. Sadly, this takes a long time, so I might go with the cheaper method of machine-sewing a liner and tacking it in.
- place a strip of muslin behind the zipper for strength
- Sew on your pockets before you line the front pieces. Also line the pockets before sewing them on.
25-11-2015 Progress Update
I’ve completed most of the lettering in the yoke for my last name. I think it looks great, though the letters are a bit tall. The colours work fine, but they scream “I’M A SWEATER” with that sheep’s grey background. I think I’ll always wonder “what if I had chosen different colours?” but I can accept this outcome.
These rows were especially painstaking. It took me beyond 10 minutes per row because I was very careful and slow, constantly checking the count, thinking ahead about how to work the floats and making sure all the twists and tensions are correct.
So far, I have found no holes, though I see a little puckering. Also, I’ve noticed some of the spots with 4 stitches between them have the carry dead smack in the middle for the entire column, making it a bit more obvious and uneven than I’d like. If I had it to do over, I’d be careful to avoid that. Overall, it looks excellent.
The tops of the tall letters are a bit of a challenge. By luck of the draw the main ball of red yarn ended at the right side on the top row of the “e”. I didn’t carry it over to the “S”; that will be done with its own bit of intarsia, combining some faire isle technique so I only use one ball of sheep’s grey for the whole field. When I work back across the “e”, I’ll carry the red yarn up and across before going back to regular faire-isle knitting for the tops of the “tt” area.
I’m almost as proud of the back of the work as I am the front. There’s a satisfying order in the chaos. Evidence of discipline. The sweater will be extra warm in this area because of all the floats, and towards the end of the evening’s knitting I considered that perhaps I should have doubleknit this area. It would likely have a different gauge and that would be upsetting.
I’ll likely finish the yoke tomorrow, but I expect no progress on Friday as I have to actually curl. Over the weekend, if all goes well, I hope to finish this panel of the sweater and prepare to block it while I cast-on the next piece. I’m nervous about how the measure will come out.
28-11-2015
At 0111hrs today, I bound off the last stitch of the back panel. It has taken me 26 days to knit about 1/3 of the fabric.
I plan to take on one of the front panels, next. Reading ahead in the pattern, I have to make certain decisions:
- what colour will each rock handle be? One gold, one red. Do I care which is which? I think left-to-right when someone is facing me, they should see gold-red-red-gold.
- Pocket Band colour: seafoam
- delete the brooms
- Omit the maple leafs from the front yoke. Replace?
I was reminded to consider my nametag while curling tonight, but looking at the pictures, I see it will be just fine to sit in the huge white void below the yoke and not interfere with anything I might put there.
Shopping List:
- #7 US circular needle, 12”
- #9 US straight needle, 6-8” (pocket band)
Challenges:
- working the pocket band in a different colour
- attaching the pocket lining correctly
The more I think of it, the more I think the yoke cannot stand on its own. It is grey and grey, in this case. I should put a design in there. Perhaps a stag on the right-front and a jumping fish on the left front.
01-12-2015
I had another weekend with nothing on the go, so I managed to get almost all of the front panel done and finished it off today. I could have gotten further over the weekend, but I stopped to consider what design I might put in the yoke of the front.
I considered lettering: “RCCC” or “RC” but decided I couldn’t get the font to fit quite right in the space available and I didn’t want the sweater to be that heavy in that spot.
I considered a different maple leaf or snowflake design, but I didn’t want anyone at the club getting it in their heads to call me “snowflake.”
I drew out a crown design as a sort of nod to the club as the Royal Canadian Curling Club, but I just didn’t like the design. I didn’t really want crowns on my shoulders.
I did not want to do like I did with the back and take a week to figure it out, so I went with nothing at all. I’ve also omitted the crossed brooms, and used the sheep’s grey on the pocket band. I’m a little uneasy about leaving the yoke blank. It may be putting the sweater off balance. Luckily, the yoke is near the top and these panels didn’t take that long, so if I want to go back and touch it up, well, I left the tails long.
I’ve now just cast-on the 38 stitches of ribbing for the left-front panel and I’ve made it just a few rows in.
There was more discussion tonight about lining the sweater. I’ve decided for certain that I’ll just use a machine to sew up a cheap jacket and then baste it in. The quilting process I read about is just ridiculous. I do want to get the pockets lined, though.
Material is the only question now. The serious contenders are silk (dupioni), rayon (breathable, static-free) and an athletic nylon fibre blend including spandex and lycra. I’ll have to do some footwork in the fabric shops.
There has been discussion about commissions, mostly jokes. It’s an impossible thing to consider, but a knitting machine would help me turn it out, and apparently “The Sweater Machine” can do intarsia. It’d be the only way.
06-12-2015
Spent most of today knitting slowly while watching TV. I really could have gotten further. I’m just about to start the arm decreases on the left-front panel, and then it’s a short sprint through three colour changes to the end. I expect to finish this panel by Friday. I’ll be curling in this sweater by end of January, no problem.
Rayon has been eliminated as a contender for lining choice. I’ve been told it doesn’t breathe and I’d be too hot. It’s still a tough call.
I have growing concerns that the sweater will turn out a touch too small, but I have to account for the effects of stockinette curl, blocking and the sag these sweaters are known for.
15-12-2015
Completed the left-front panel some time last week, maybe around Wednesday or so. It looks good, and I’m pretty confident the two sides match, but the stripes in the yoke may be off by 1 row. I’m prepared to accept that. I’m also prepared to frog back after I see how it lines up when I baste it together.
I’m now working on the right sleeve. I’m about 65% done and at the part where it says “if you want a longer sleeve, add rows here. Must figure out how long the sleeve will be and how long my arms are. It’s tough to measure your own arm.
16-12-2015
I’ve finished knitting the right sleeve. I’m a bit concerned the “2” is a bit too thick in the diagonal, but it looks good enough. It’s a shame I really can’t change it for the other arm without going back and fixing it on this side, but I won’t be doing that.
I did two rows of white past the colour and then bound off. I’m a bit concerned it wasn’t supposed to be that way, but ok.
I tried it on, since it basically curls into a tube on its own. Looks good. Now I get to do it all again.
20-12-2015
My friend Derek came over and basted together the back, front and right sleeve. I tried it on and it looks great! Fit is pretty close. I think it’s a little small, but the project hasn’t been blocked yet.
I kinda wish I had put more colourwork into the front, but the back looks mind-blowingly good.
21-12-2015
I have now begun the left sleeve. Had to make up a new ball of yarn. Barely made it anywhere, but it’s started.
21-01-2016
I finished the left sleeve the other day.
I did the cuffs of the sleeves using US #6 needles and I think that was a very smart choice.
At one point I had the whole thing basted together and tried it on. It’s slightly snug, which is about perfect considering I haven’t blocked it yet.
Made an attempt at the collar, but I didn’t like the way it turned out. I knew from looking at other examples of this pattern’s output that it would be too narrow, so the first collar was pretty much guaranteed to turn out wrong. I have widened it considerably (TODO: post your formula here for posterity). The stripes were in the wrong spot, too. Anyhow, so I’m almost done re-knitting that.
There’s still one spot on the front I want to fix, but I’m getting pretty lazy, so I’ll probably leave it. My goals right now are to finish the collar and get ends woven in this weekend. Then it’s block city and seaming! I’ve been promised lots of help with making a lining and getting the zipper put in, so it’s just on me to get through these last steps and I’ll have a sweater to wear.
The thing is, I think I like making the sweater more than I do the idea of wearing it. Kinda makes me not want to finish…
24-01-2016
Went out to Dan’s house today to work on the liner. We got a pattern drawn up and an estimate of the material needs then went off to Fabric Land! We were lost, so we started asking around. The liners didn’t seem great and I had conflicting information about breathability. I figured silk was a safe bet, so we went in search of that but found nothing smooth. It had a lot of texture and ultimately I did not like any of the 8 or 14 colours they had there. Back at the table where they kept the jacket linings I started to talk to the sales lady and she suggested rayon.
We had a funny conversation about the project once I produced one of the pieces and then the back piece, all of which I had on me so Dan could size it up. She was impressed and called over another lady,
“HE did that.”
To which the newly-arrived sales woman said, “of course.”
“Yes, but HE knit that.”
“Of course he did,” she says again. Her colleague just couldn’t believe a man sat down to do such a thing. Anyhow, we talked about knitting machines, and how she had learned to use one in home economics class.
She asked where I was from and I said, “Newfoundland. Grandma taught us all. I guess my generation of the family is all boys.” She also seemed impressed that I had only started on November 2nd. To her this was impossibly fast.
Anyhow, they were impressed, and I was proud and we hurried to the cash with $28 of off-white rayon jacket lining, which I got half-off on. The store was closing, the line was long and their debit machine decided to not work. Of the $14.75 price, I had $14.00 on me. The machine would not respond. I dashed out to borrow a $20 bill off Dan and he just had a loonie. Good enough. Dashed back in and the line could flow again. Poor ladies. We held them up at the end of their work day. Shame on us. On a Sunday, too! Tsk.
After the Fabric Land adventure Dan pinned out the pattern onto the cloth and I got to see how that was done. I worked on re-knitting the last 43 rows of the collar I had frogged on Thursday after realizing I’d made certain reductions on the wrong side of the piece. Technically at this point all the main knitting is complete! Unfortunately there’s a mistake on the front-left panel that I will definitely have to fix. It will probably take an entire evening and I’m realizing I have very little time to work on the sweater this week.
With the lining sorted out and in progress I am anxious to have it done after resting it a bit too long. I’m a bit disappointed in myself, to be honest. I had set a goal to complete it by February 2nd and I feel like I could have made it but now I will not. I think I can get pretty close, though. If I’m serious about things, I need one day this weekend, what little time I’ll have this week, plus next week to get ready to tack the lining in. Then it will be a matter of meeting with Dan and maybe having a sewing party. I don’t know how long it will take to do that sort of thing, I’ve never lined a jacket before.
COLLAR RECIPE
With main colour wool and #9 needles, cast on 8sts.
1st row: K.
2nd row: K2, inc in next st., K to last 4 sts, make 2 by knitting into the front and back for the next 2sts. K2.
Repeat 1st & 2nd rows 3 times more. (20sts on needle)
9th row: K.
10th row: K2, inc., K to last 3, inc., K2
Repeat 9th and 10th rows 5 times more. (32sts on needle, row 20)
Row 22: switch to gold
Row 28: switch to white
Row 34: switch to gold
Row 40: switch to white
Row 72: switch to gold
Row 78: switch to white
Row 84: switch to gold
Row 90: switch to white
Row 91: K2, K2tog, K to last 4, K2tog
Row 92: K.
Repeat 91st and 92nd rows 4 more times (22sts on needle)
Row 103: K2, k2tog, K to last 6sts, K2tog, K2tog, K2
Row 104: K.
Repeat the last 2 rows 3 more times, until 8 sts remain. Bind off. 110 rows.
NOTICE: much of the math in here is suspect. The colour rows may all be 1 higher than they ought to be, i.e. I think you need to change colours on odd-numbered rows.
03-02-2016
I’ve been working on weaving in ends over the last several days. Julien and Caleb have helped a little bit.
Currently Done:
I’ve also re-knit the top portion of the left-front which had a small mistake in the garter stitch where I changed colours on the wrong side. It looks much better now.
Weaving in ends on the left-front piece is in progress with 10 more yarns to weave in. Then it’s just the two sleeves and I can block everything. Then seaming. Then sew in the liner…
Speaking of the liner, Dan had completed it the day after our excursion to FabricLand, but I thought it was too restricting in the armpits and asked him to adjust it. He added a dart to the top of the sleeves and I tried it on again this Monday to much satisfaction. He’s opted to wait until I have the sweater seamed together to finish the edges, but otherwise it’s done.
I’ll have time to work on this project Saturday and Sunday between chores and a party on Saturday night.
08-02-2016
A tiny amount of progress was made during the week, and then none on Saturday. Stayed over at Dan’s after the party and we managed to finish weaving the last of the ends.
I was also able to block the sweater according to the instructions in the Mary Maxim pattern and the sweater looks great. The rocks and the lettering on the back look especially good. The bottom of the maple leaf design and the sleeve numbers are not so perfect, but it’s okay.
We started seaming and found it extremely slow going. Not happy about that. Dan was able to make good progress, getting 1 sleeve closed and the front-left attached to the back panel, but all my work has to be undone as I couldn’t get it to line up correctly. At the end of our time together, he showed me exactly how he was doing it and I think I can get it right when I try again on Tuesday.
I couldn’t stay past 1700hrs at Dan’s because I had volunteered to curl for someone who wanted to watch the Super Bowl. I won’t be making any progress tonight, either, as I have practice ice followed by a game at 2030hrs. My bag was too full to drag the sweater along.
10-02-2016
Last night Derek came over to help with some seaming. We got the right-front panel seamed onto the back at the side, and the right sleeve is now seamed shut. At the same time, I worked on the shoulder seam for the left side. I think I mostly used the right technique, but after finishing it the second time, I was still unhappy with the result.
Initially I used a different video to guide me, but I think this one explains how to deal with the discontinuities a little better: https://www.youtube.com/watch?v=wkThlgDTdOE
It also mentions that she steams the seam after it’s done, so I think I’ll try one more time and then steam it and see if it’s any better.
I’m also realizing that I should have attached the sleeves before seaming them shut, like in this video: https://www.youtube.com/watch?v=urOn3DSHBlc
I did what I did because I thought the sleeve would be the easiest, least showy place to learn proper seaming. That was successful, but it’s going to make attaching the sleeve that much harder. I plan to try anyhow and will undo the sleeve seams if I have to.
I’m very disappointed in the time this is taking. Hopefully the long weekend coming up will give me a chance to get this all done, even though there’s a party on Saturday night and I’m supposed to spare in curling on Sunday night.
I’m becoming concerned that the sweater will be a bit small. I’ll be very disappointed if that happens, but I know I can add in long, narrow sections of white stockinette on the sides and seam them on if I have to, so I’m not too worried. I can do the same under the arms, but I’m not sure how I’d make the shoulders bigger.
15-02-2016
I have finished seaming all the pieces together. The collar was a lot of trouble. I did it twice and I’m not confident it’s totally correct, but it looks acceptable, nonetheless.
The sleeves are too short and the chest is a bit snug. I plan to soak the sweater in a Eucalan bath and see if that makes the sleeves long enough. If it does not, I can just add ribbing to the cuffs.
After the warm bath, I’ll have to sew on the zipper. I still need to buy a zipper…
The hope is to get the sweater wearable for Friday’s curling game. I’ll probably get some of Dan’s help over the coming weekend, if not before, and that will be to do the lining, but I have to curl all day Saturday, so, possibly sooner?
16-02-2016
I bought a zipper today. It’s got white plastic teeth on a cream backing with a metal pull that’s been painted white. It’s twenty-two inches long, and cost $4.50 at that place that sells buttons on the South side of Queen at Spadina. It’s perfect.
Scrubbed the tub tonight. Poured an unspecified amount of Eucalan in and filled ‘er up about 1/3. Took me about 30 whole seconds of standing over the tub with the sweater in my hands before I could work up the courage to put it in. Dipped some ribbing at first…then I realized it was now heavier than everything else, so I just dunked the whole thing. Patted it all down and then went downstairs to forget about it for a half hour.
I came back upstairs about 5 minutes early armed with 6 towels and half a plan. I agitated the water a little and then tried to gather the sweater together so I could hold it all in my arms without letting anything droop. I cuddled my sweater against my chest as a steady stream trickled into the tub for minutes, while trying my best not to let any pieces escape and stretch, or absorb more water.
The water in the tub was fairly grey. Did I not get it clean enough?
I laid the sweater out in a towel and swaddled it into a loose bundle before transferring it to the futon. There, waited a spot prepared 3 doubled-over towels deep. I laid it on its back and fussed over it a bit. I tugged the sleeves a bit to make sure they lengthened. That’s the whole point of all this tender love-making. It’s a stupid risk for nothing if it doesn’t make the sleeves longer to save me from knitting and seaming on more ribbing to both sleeves.
Going back to the tub to pull the plug, I noticed there’s a lot of sand in the bottom. That’s not left over. That came off the sheep! Briggs and Little is nice stuff, but it’s dirty, no doubt. I cleaned the tub, again, and then I went back to fretting over the sweater and pulling the sleeves. I probably shouldn’t do that, but I can’t really help myself.
Then I took a bath. I mean, I earned it, what with the cleaning and giving something else a bath and all, I figured I better get while the getting’s good. Took about a half hour. Then I noticed the front of the sweater is pretty dry. Okay, so I turned it over onto a bit of dry towel. But are the arms really long enough?
Only one way to find out.
I shouldn’t have.
I tried it on. Gingerly. Everything seemed good. Maybe a touch too long, both in the arms and the body. That’s fine. It’ll shrink down a bit. Fine, right? Sure…it’ll be fine…
Besides the fretting, I have to say the yarn has bloomed, for sure. Also there are places in the letters where you can see a little gap between columns and the other colour pokes through. The wetting seems to have made that more obvious. I am disappointed, but mainly, I just needed to get the tension right when I knit it, so too bad. It’s more important that it fits.
16-02-2016
Everything smells like sheep.
18-02-2016
Today I decided the sweater was dry enough, even though it’s still damp, and I want to wear it to my curling game tomorrow. I bought needle and thread, came home and got to work after making dinner.
The first pinning didn’t go so well, so I started again. It is almost always a mistake to start from one end and work towards the other when you’re trying to line something up. The second time, I put a pin at each end, and then the middle, and then intermediaries. This gave me an even result.
I used a simple backstitch for the sewing. My sewing is tolerable, but by no means even.
I plan to wear the sweater out tomorrow and curl in it! On Sunday I’ll get a chance to take care of the following items still left to do:
- Add a second line of stitching to the zipper / re-sew the zipper entirely to better hide it / buy and sew-in a zipper with metal teeth, which I think might just look better.
- Shore up one of the shoulder seams where it’s a bit loose
- Clip extra ends of zipper backing
- Thoughtfully place all my curling pins on the chest
- Finish and tack in the liner
- Update this page with thank-yous to all those who have helped me with this project
- Audit my leftovers and consider returning whatever I may
It’s been a long, hard slog to get this done. A friend wants another one and I want to make one for my sailing skipper. Romni is having a 20% off sale on their winter weight yarns. I’d love to take advantage of that, but I’m also not totally sure I’m ready.
One thing about knowing how to do all this is I’m not afraid to change whatever I want. I’m not afraid to replace the zipper. I could re-knit the collar, or make longer cuffs, or hell, replace the arms altogether because I think I could do a better job with the numbers. All of these pieces have flaws worth correcting, but they are also acceptable and I don’t want to be working on this for eternity. It’s time to move on.
24-02-2016
AUDIT
Remnants:
- 1 full skein Rust
- 1 full skein Washed White
- 1 full skein Seafoam
- 20g Sheep’s Grey
- 50g Seafoam
- 64g Rust
- 64g Gold
- 14g Washed White
Waste:
- 64g Failed Collar (Washed White & Gold)
- 56g Offcuts
wool-on-sweater + waste costs, taxes in: $58.75
Zipper: $4.50
Lining material: $14.75
Project Total Cost: $78.00
value of usable remnants: $35.26
value of waste-yarn: $7.68
% of yarn costs in waste-yarn: 13.07%
% of project costs in waste-yarn: 9.85%
Unaccounted Incidentals:
- Eucalan (~2tsp)
- Vim (for cleaning the bathtub, lol)
- Extra laundry quarters for towels used during blocking
- Laundry soap for towels used during blocking
- hand soap (because I always wash my hands before I pick up my knitting)
- TTC tokens (for going back-and-forth to Dan’s)
- sewing thread for liner and zipper
TAKE-AWAY
I’ve always believed that when hand-crafting a quality item, assuming the craftperson’s competence, more waste generally means higher quality. If I had left short tails, they would have been harder to work in and secure properly. If I had used fewer colours, there would have been less waste. If I had tolerated that terrible first collar attempt, it would have saved 64% of the waste! 9-13% seems somewhat shocking, but I can also see it as totally reasonable.
The next sweater I make should have about 5% waste, and I’ll hopefully be able to use some of that collar waste on that very sweater.
As always, you do not save money with knitting. Mary Maxim sells the kit for a curling jacket for $74.99, or 84.74 after taxes. Roots was selling finished sweaters for about $200. Mine is 100% wool, while the Roots version is 40% acrylic/35% nylon/25% wool. It also ain’t got your name on the back. Just saying.
PLAN
I’m going to buy the wool for Dan’s sweater tomorrow, so I can take advantage of Romni’s 20%-off-winter sale. I plan to return the 1 full skein of washed white, so I can get 9 more, all from the same dye lot. I won’t need any more rust, sea foam or gold, but I will need 1 sheep’s grey. It’s a bit of a risk to not get more gold, but so be it.
Tomorrow’s Spend:
(((10 * 6.40) * 0.8) - 6.40) * 1.13 = $50.62
UPDATE
At the bonspiel on Saturday I got no end of attention for the sweater, and while rather intoxicated a nice fellow asked me to spare during his league game the next day at noon. I had to bail on Dan for doing the sweater lining so that has been moved to this weekend coming.
I’ve noticed the velcro fastenings on my curling gloves are gently gnawing at the cuffs of my sweater, so I’ve bought snaps ($4.50) to replace the velcro with.
02-03-2016
Sewing in the liner began on Sunday, the 28th of February. I tried on the liner and then put the sweater on top and Dan took a good hard look at it all, then he decided it was good, so he finished the edges of the liner with his sewing machine. While he was at that, I took some of the sheep’s grey wool and shored up the spots after each “r” in my name where the red was showing through. It’s a bit rough, but it looks much better now. A little cheating goes a long way.
By 1600 or so he had it all pinned in, but no actual sewing had begun. I packed it up and headed downtown to watch the Scottie Tournament of Hearts with my roommate and boyfriend at the local pub.
I’ve spent the last 3 days cursing at the hand-sewing I have to do. I hate sewing. I’m terrible at it. Regardless, I’ve attached the liner along the zipper on both sides and along the top. Last night, I managed to get a pocket done, too. Tonight I’ve gotten through the other pocket and both cuffs. It took me 50 minutes to get one cuff done.
My technique improved a lot between the first pocket and the second. The trick is to get just barely under the pocket band and then stab up through the yarn stitch instead of out through the fabric. The first one has some visible stitching and a bit of a tension line where the liner attaches to the front. I’m a bit disappointed, but I’m loathe to go back and redo it.
The other thing about the pockets is that with the main liner fully pinned in place, I didn’t have access to the back so I used a running stitch instead of the overcast that’s recommended.
The pocket liners feel like they’re too big. It’s as if the bulk of the fabric actually makes the pockets smaller. I haven’t sewn the bottom edge down.
My back-stitch started to get somewhat even by the end of it, and now my overcast stitch is starting to look OK. I’m sure there are more revelations to come.
Now all that’s left is the big seam along the bottom edge of the liner, and maaaybe a couple tiny spots in the armpits and shoulders. Then she’s really done.
I don’t have to curl on Friday, but I am going snowboarding on Saturday. I’m hoping to get the sweater ready for action by Monday night’s game.
07-03-2016
I managed to finish the hand-sewing of the liner on Friday, just before Dan picked me up for our snowboarding trip. I decided not to tack it down in the armpits and shoulders.
So far, it wears well, though I’ve not curled in it. The liner makes the sweater look more opaque, and therefore, more even and professional. I have found that when washing my hands, it sometimes comes tight across the back, so I’ll have to watch that.
I get to curl in it tonight!
Besides this, I’m converting my curling gloves from velcro to snaps. That’s going so-so. The snaps are sew-on and the thread shows badly. Also the strap that one side of the snaps attach to is some weird rubber stuff and I’m not sure how well it will hold up.
It takes a long time to do the gloves because the velcro shares a seam with a hem, so ripping it out means replacing the hem, as well as sewing on the buttons.
01-01-2018
I’ve been curling in my sweater for about 1.75 seasons now. I wear it for every game, and sometimes when I’m sitting around the house, too. In the 2015/2016 season I was pretty much just playing on Mondays, but for the ‘16/17 season, I spared on Thursdays a lot. Almost every week. Eventually, a team asked me to play with them and we have been undefeated so far in 2017! We started in D league, so we are now 7th in the league overall.
The Monday team is also doing very well. We have 2 losses and 1 tie, having won all our other games, so that puts us in 2nd place for 2017.
I am extremely happy with this sweater. Now it’s time to give it some love, because it’s starting to look a little tired.
On Thursday (28/12/2017) I cut the liner out of the sweater. It was ripped under the right arm and had always been too small. It was also a bit dingy at this point. Dan and I plan to make a new liner that is larger at the same time we make the liner for his sweater.
I have worn it around a bit without the liner and I like the way it fits and feels, though I do miss the liner. I feel like I’m hurting the sweater every time I put it on or take it off.
Then on Friday I gave the sweater a bath. A lot of gunge came out, but there is still a grey spot on the collar and the ribbing along the waist at the rear has maybe picked up some indigo from my jeans or some gray grunge from TTC or maybe those ancient chairs at the curling club. I think it doesn’t show.
I think I’m happy with the result overall, but I might wash it again soon to see if I can get a bit more out of those two gray spots. Maybe a spot wash, but really, you can’t scrub this stuff, so it’s more of a “dilution is the solution to pollution” approach.
Anyhow, I’m very likely to be playing my next game without the liner in the sweater. I wonder if I’ll like that more.
19-11-2018
I spent some time yesterday doing a repair to this sweater. Since my last update in the middle of the 2017 season, I’ve been wearing the sweater without a liner. I actually like it and it helps the sweater accommodate for my added weight since 2015.
The problem was that my right sleeve had begun to fray where the wrist gets trapped between the broom and my glove when I sweep. I put in a life-line and then unravelled back to it. Picking out the cast-on and going “up” the knitting is surprisingly a lot different from frogging down the knitting like you would normally do. I went back 4 rows, put 1 row back on and then bound-off.
It was some yarn chicken, and the result is not perfect. It looks like I was maybe off by 1 on the ribbing, or maybe it was doomed to look wrong given I was now knitting in the other direction. I’m not sure - perhaps I was supposed to twist the stitches. The bind-off is also tighter than the cast-on that was there previously, but this should be good for keeping it out of the way from now on.
The sweater also needs another bath. It’s especially grey on the right-hand chest and armpit where my broom rubs it as I sweep. Sweeping is definitely the most destructive thing that happens to the sweater. Otherwise, it’s in very good shape and should continue to serve me for a few seasons yet.
12-04-2020
I’ve been curling twice a week all season in this sweater.
Several weeks ago I noticed the ribbing on the front right panel had worn through right at the cast-on. I found a technique for fixing it:
https://www.youtube.com/watch?v=6ZZS83HCs1c
Previously when I had fixed a similar problem in the cuff, I was unhappy with how the ribbing seemed to shift 1/2 stitch. This technique addresses that.
I used a different bind-off that’s meant to be extra stretchy, since it seemed appropriate for the ribbing. Ultimately, it looks a lot different from the others, but I think that over time it will get flattened and no one will notice.
I have some veggie-tan leather on its way. I intend to sew some over the areas that previously wore through. There’s also wear happening across the right breast from sweeping. I may try to use a big old-school curling patch over the area, but I don’t really like them.


 troysurrett notebook
  handspun
 queue
queue favorites
 friends
 needles & hooks
 library